Content Creation Process // Part 1

Leave a comment
Project Development Studio

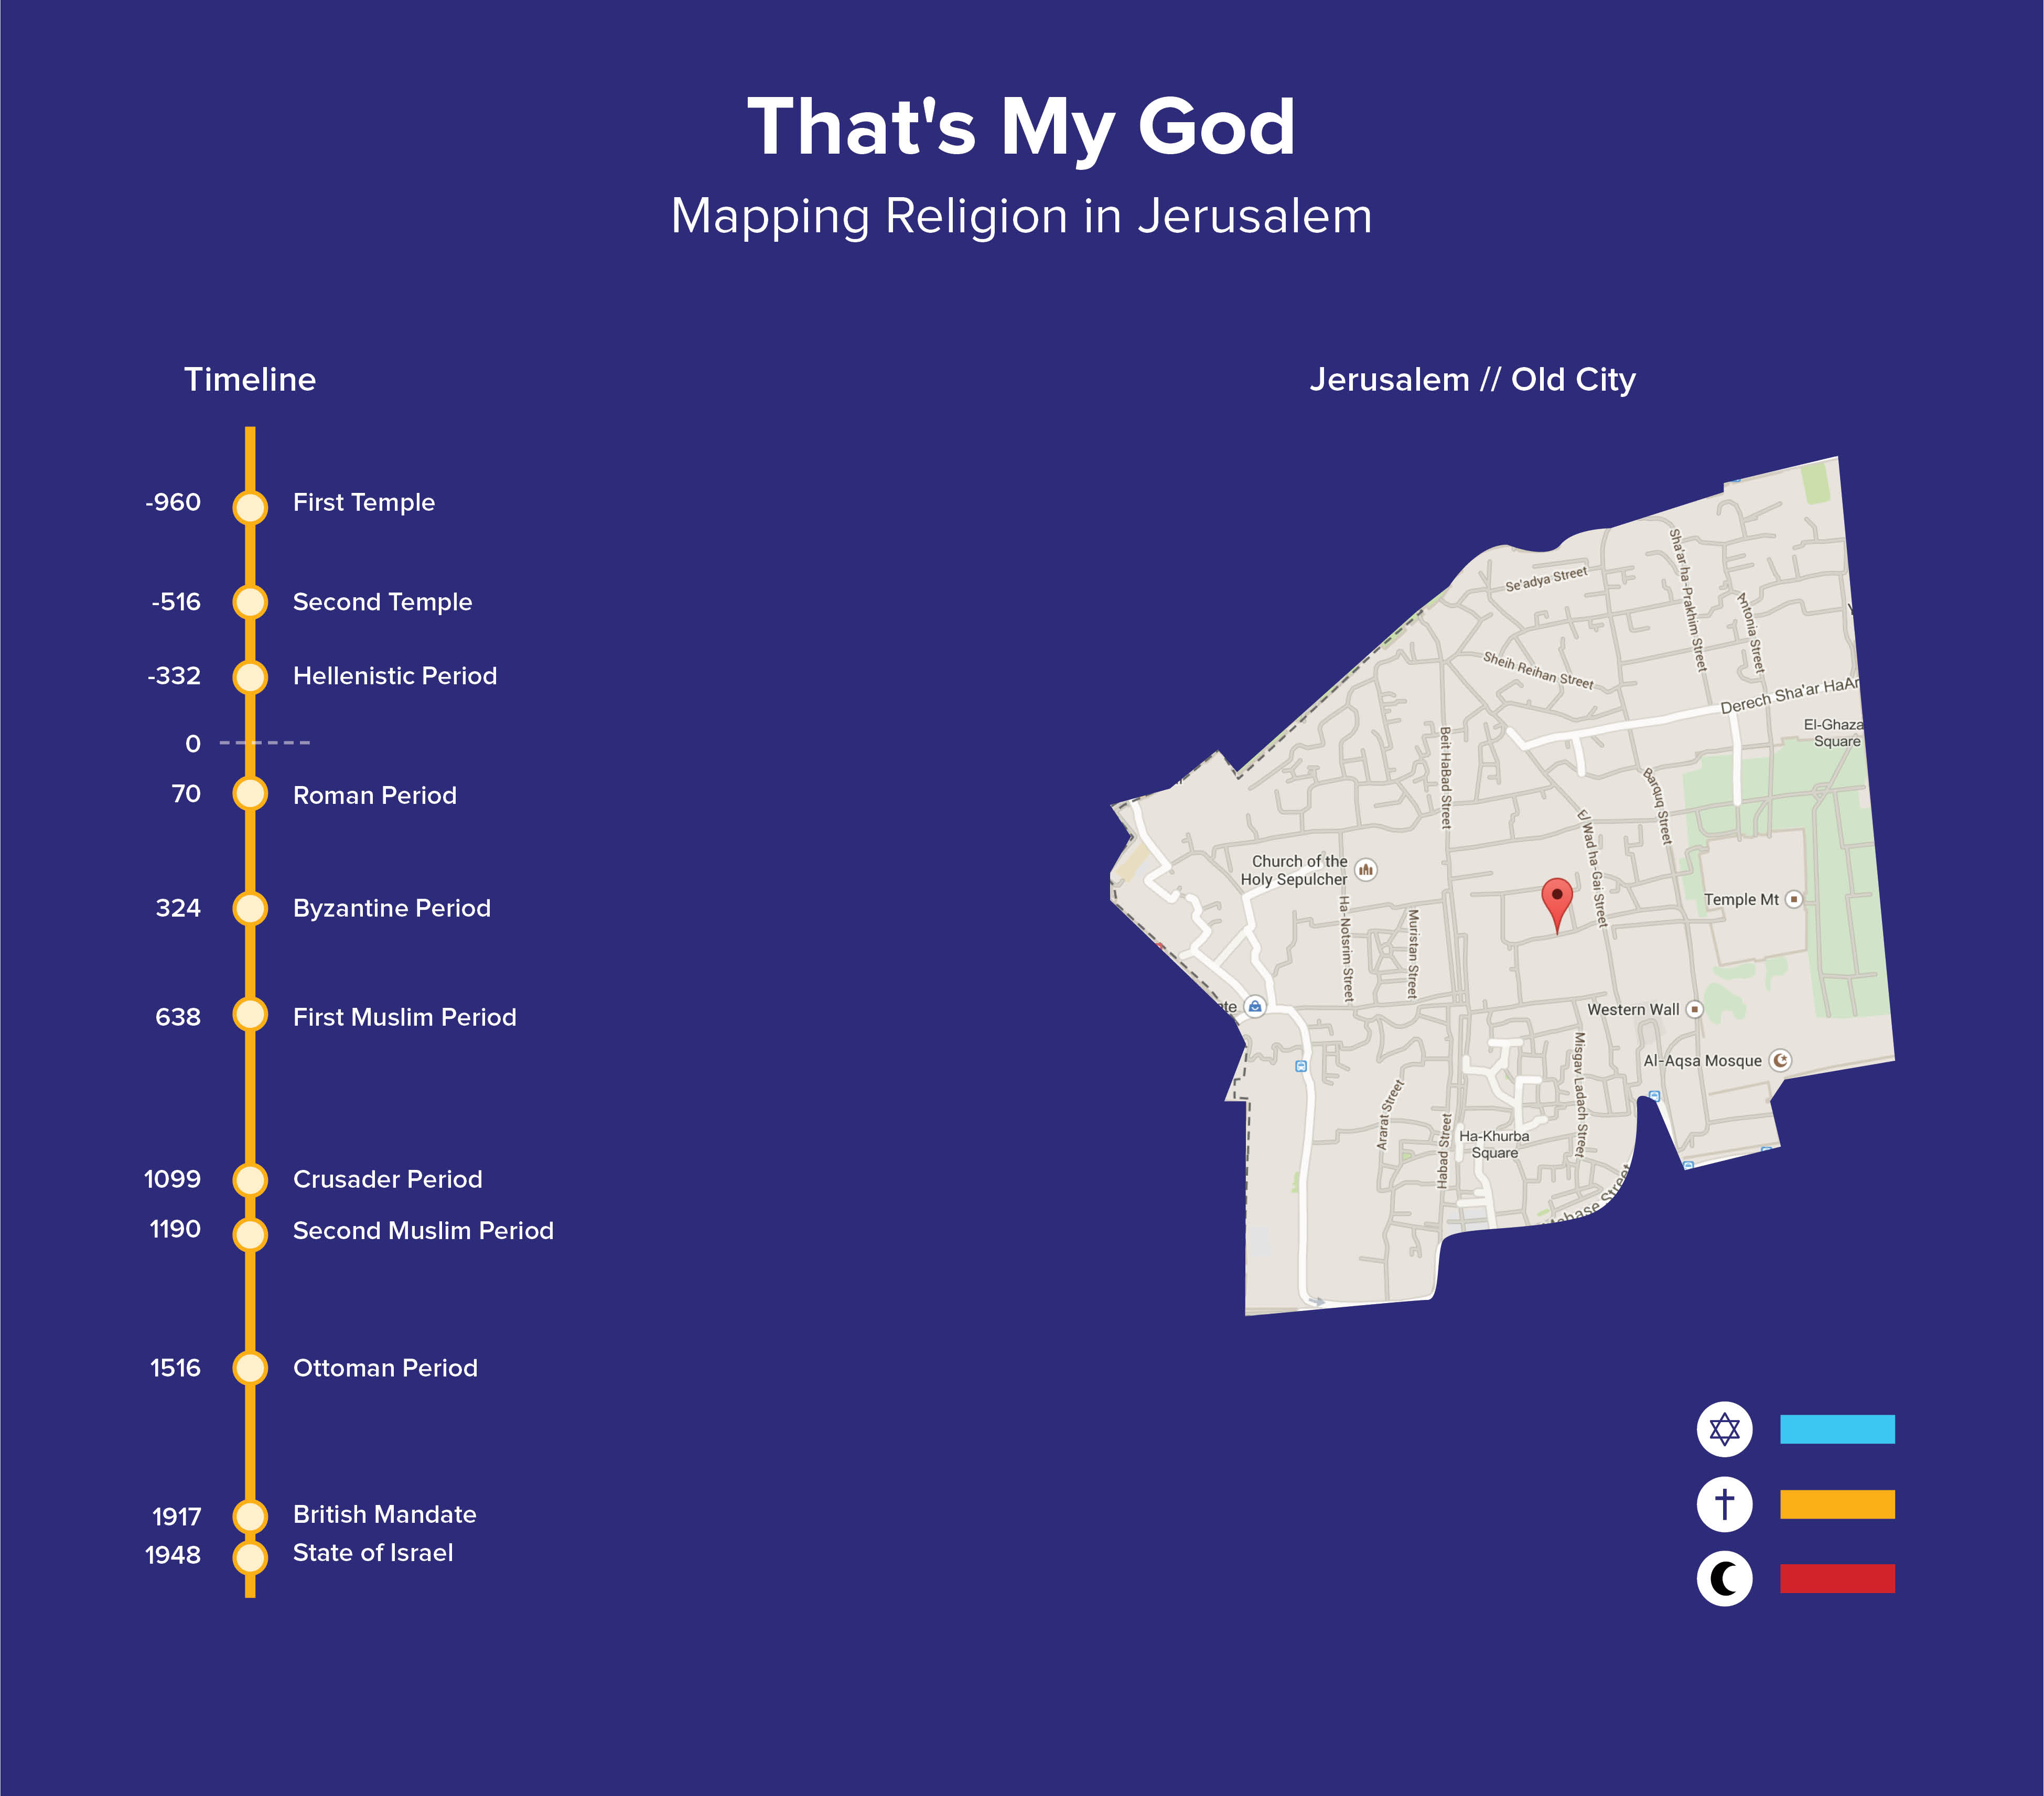
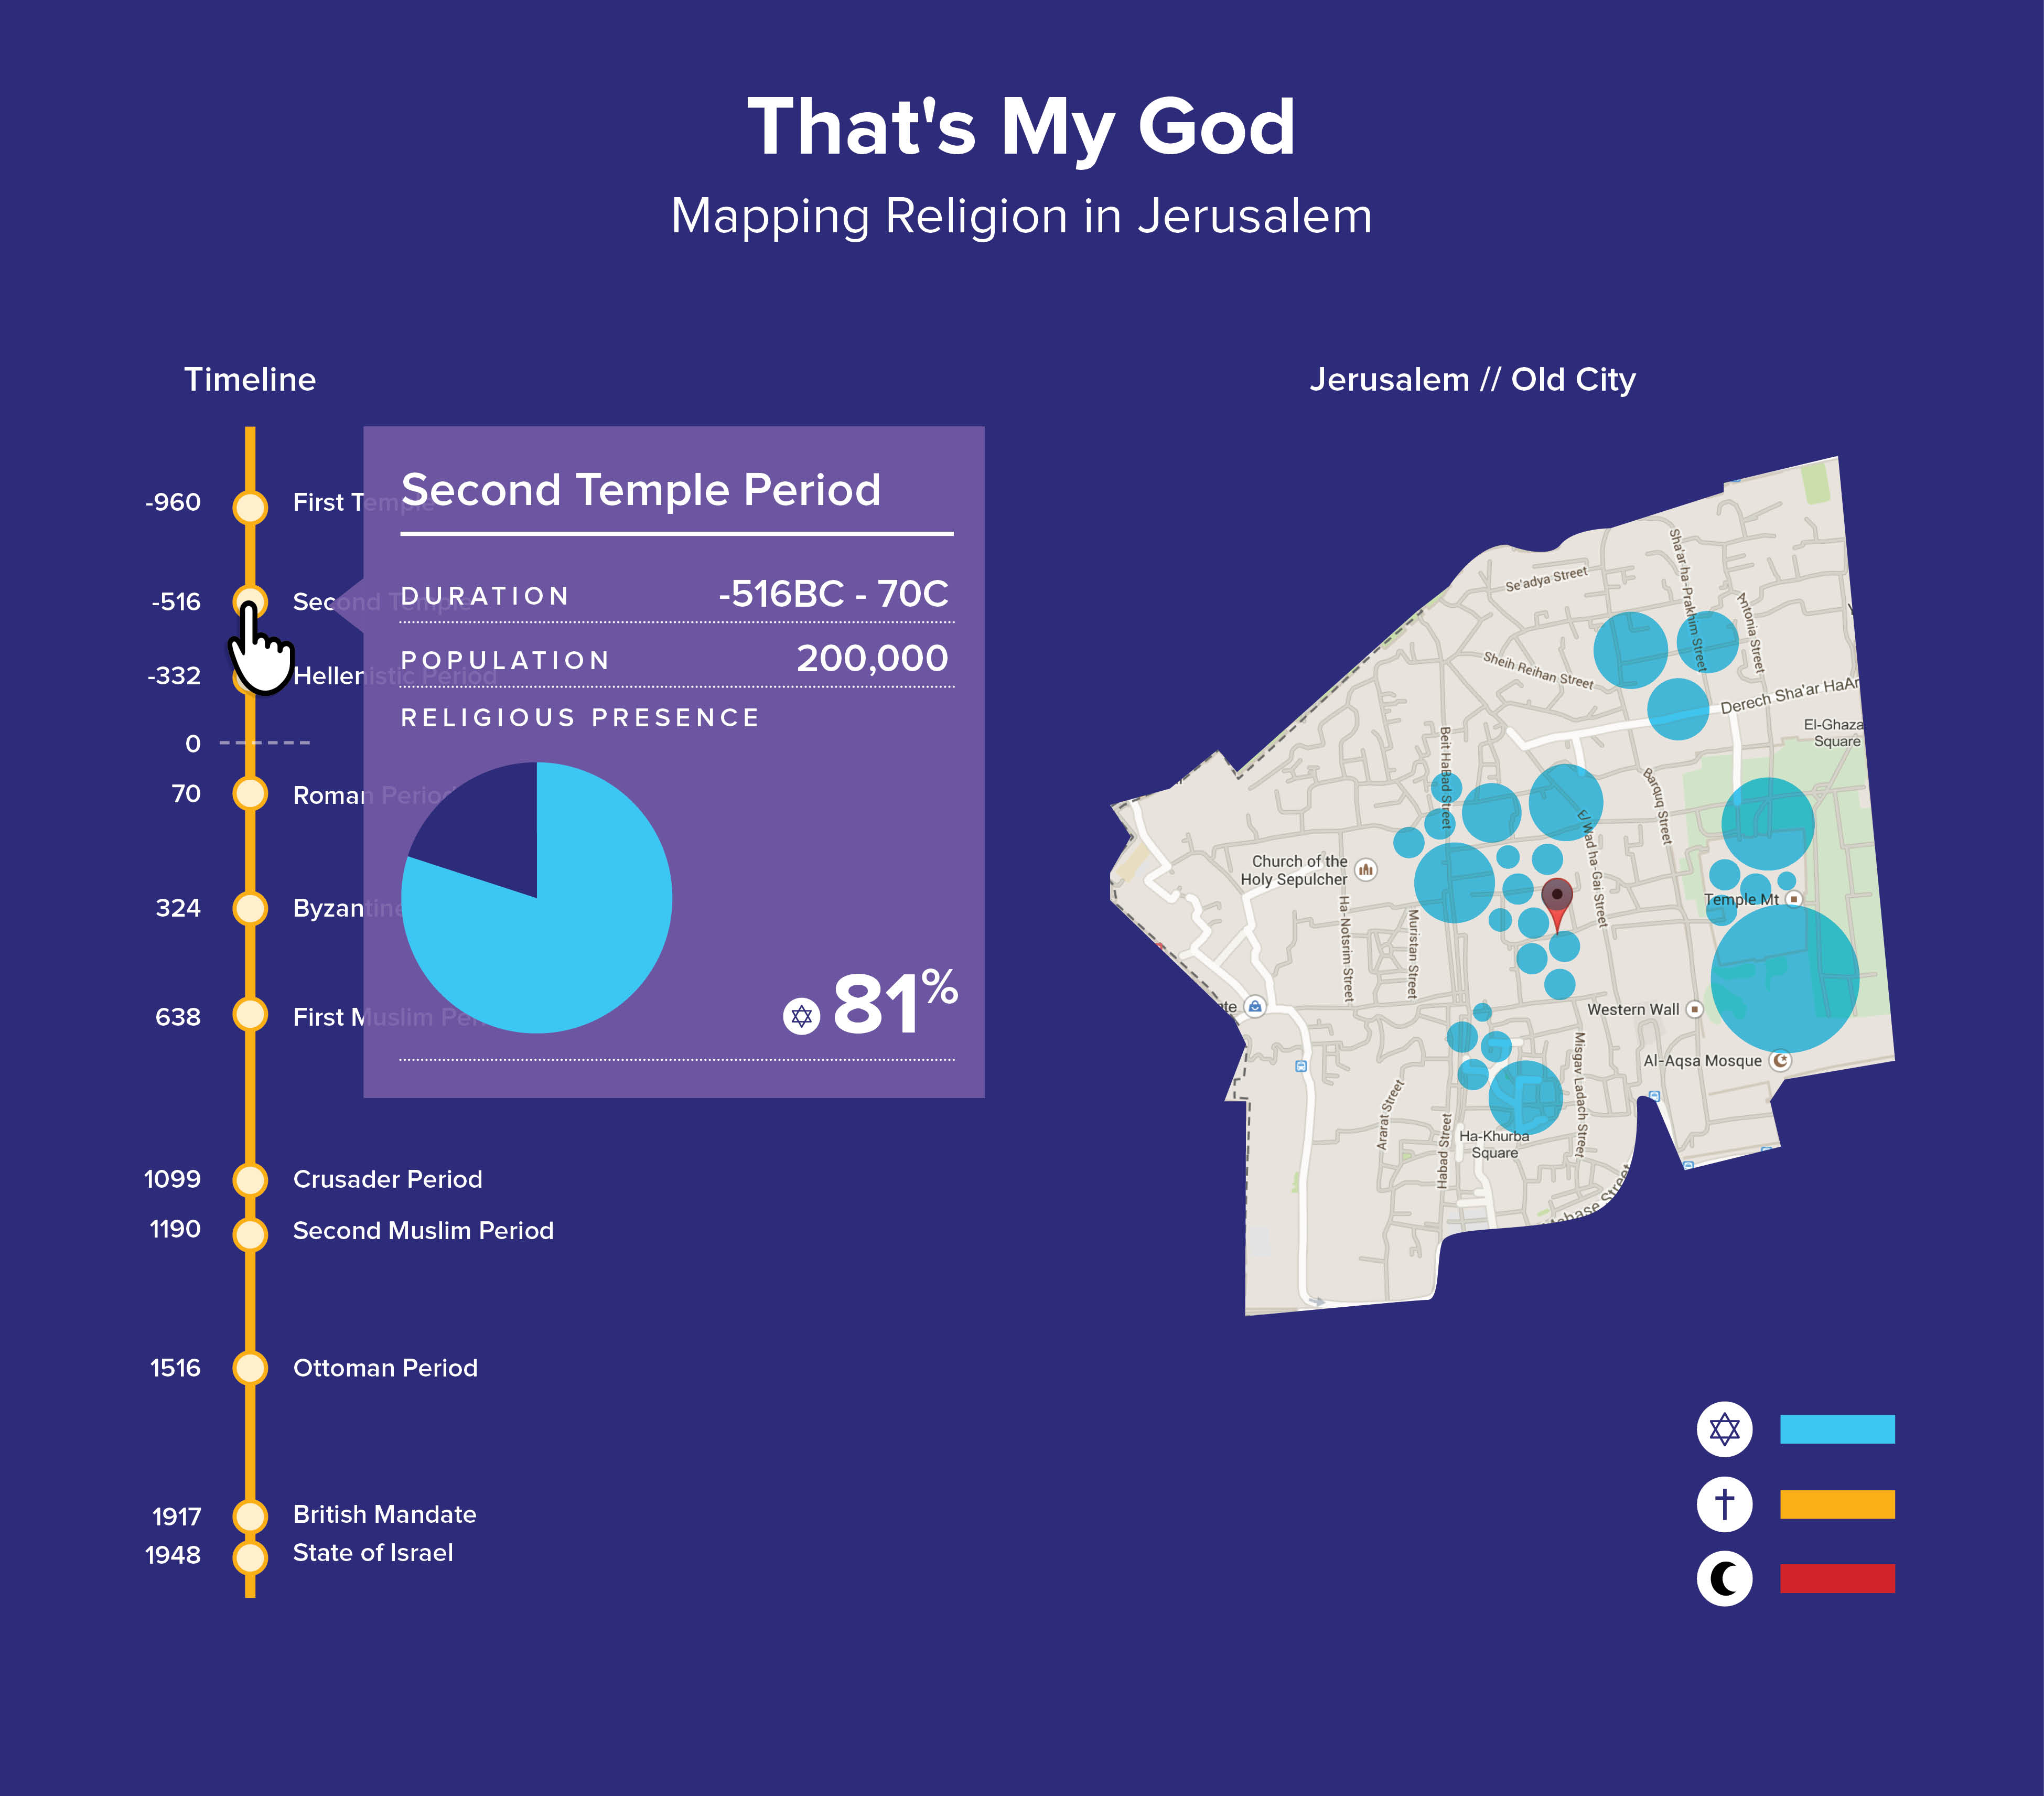
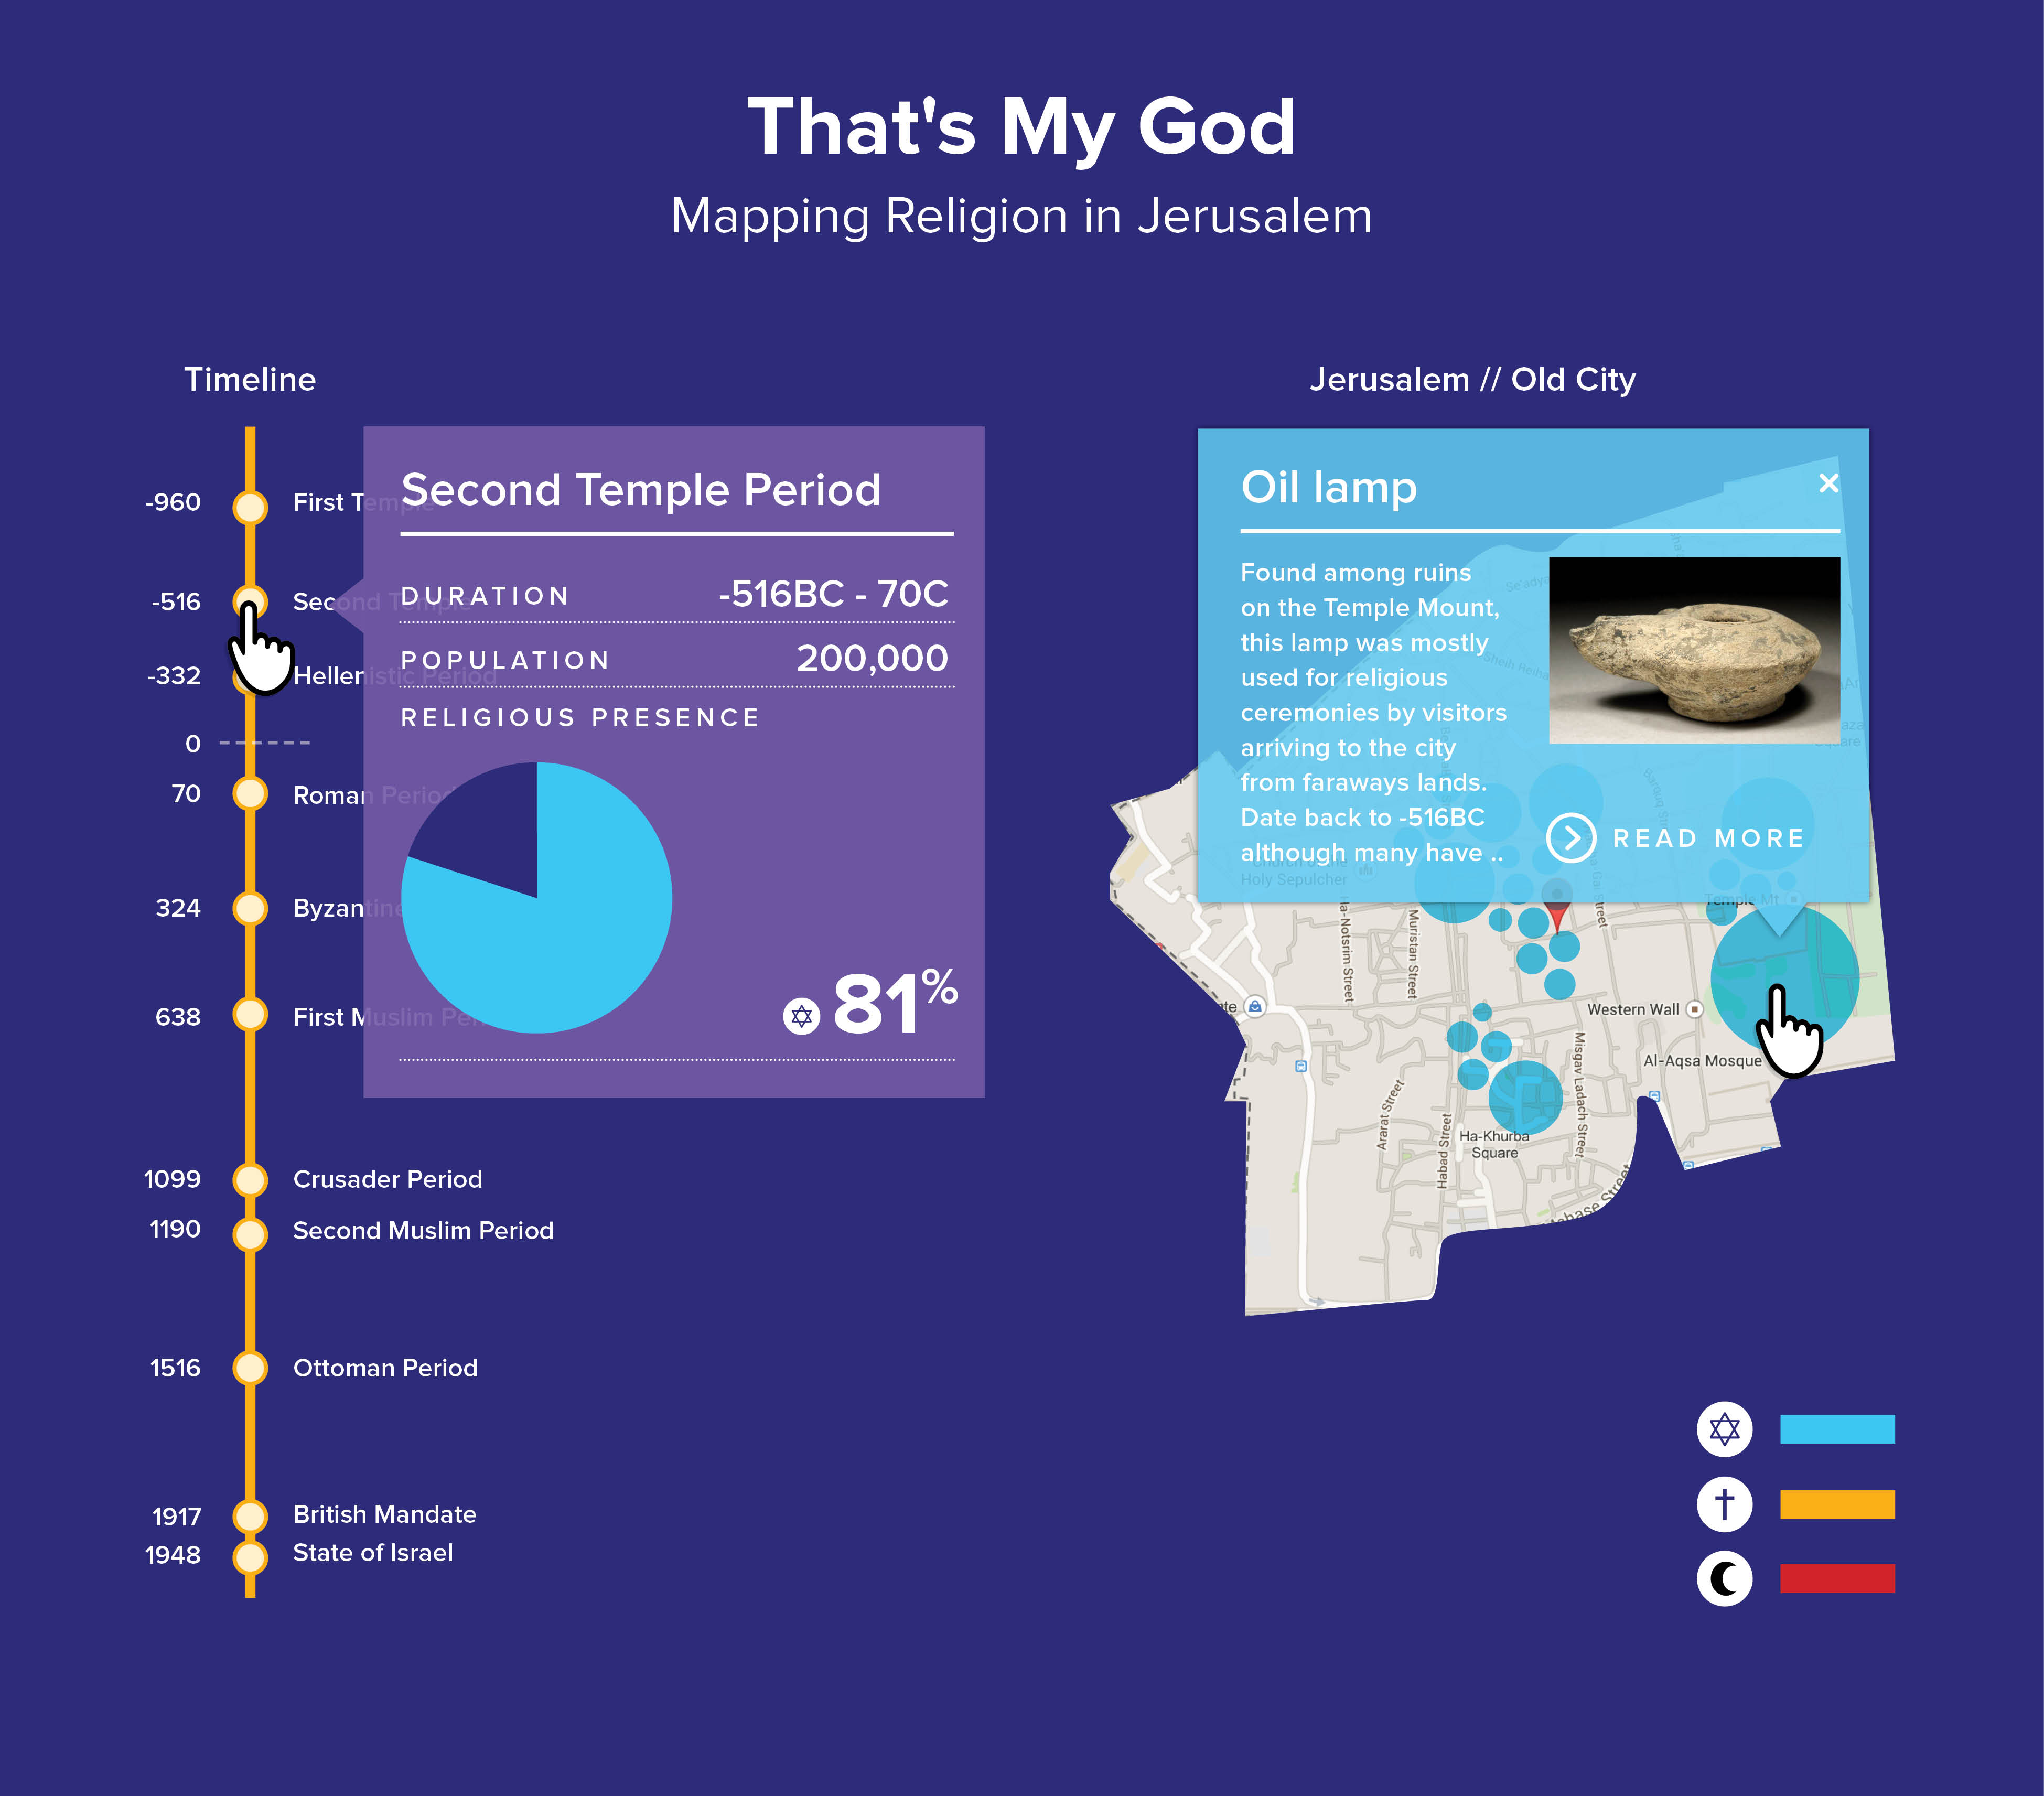
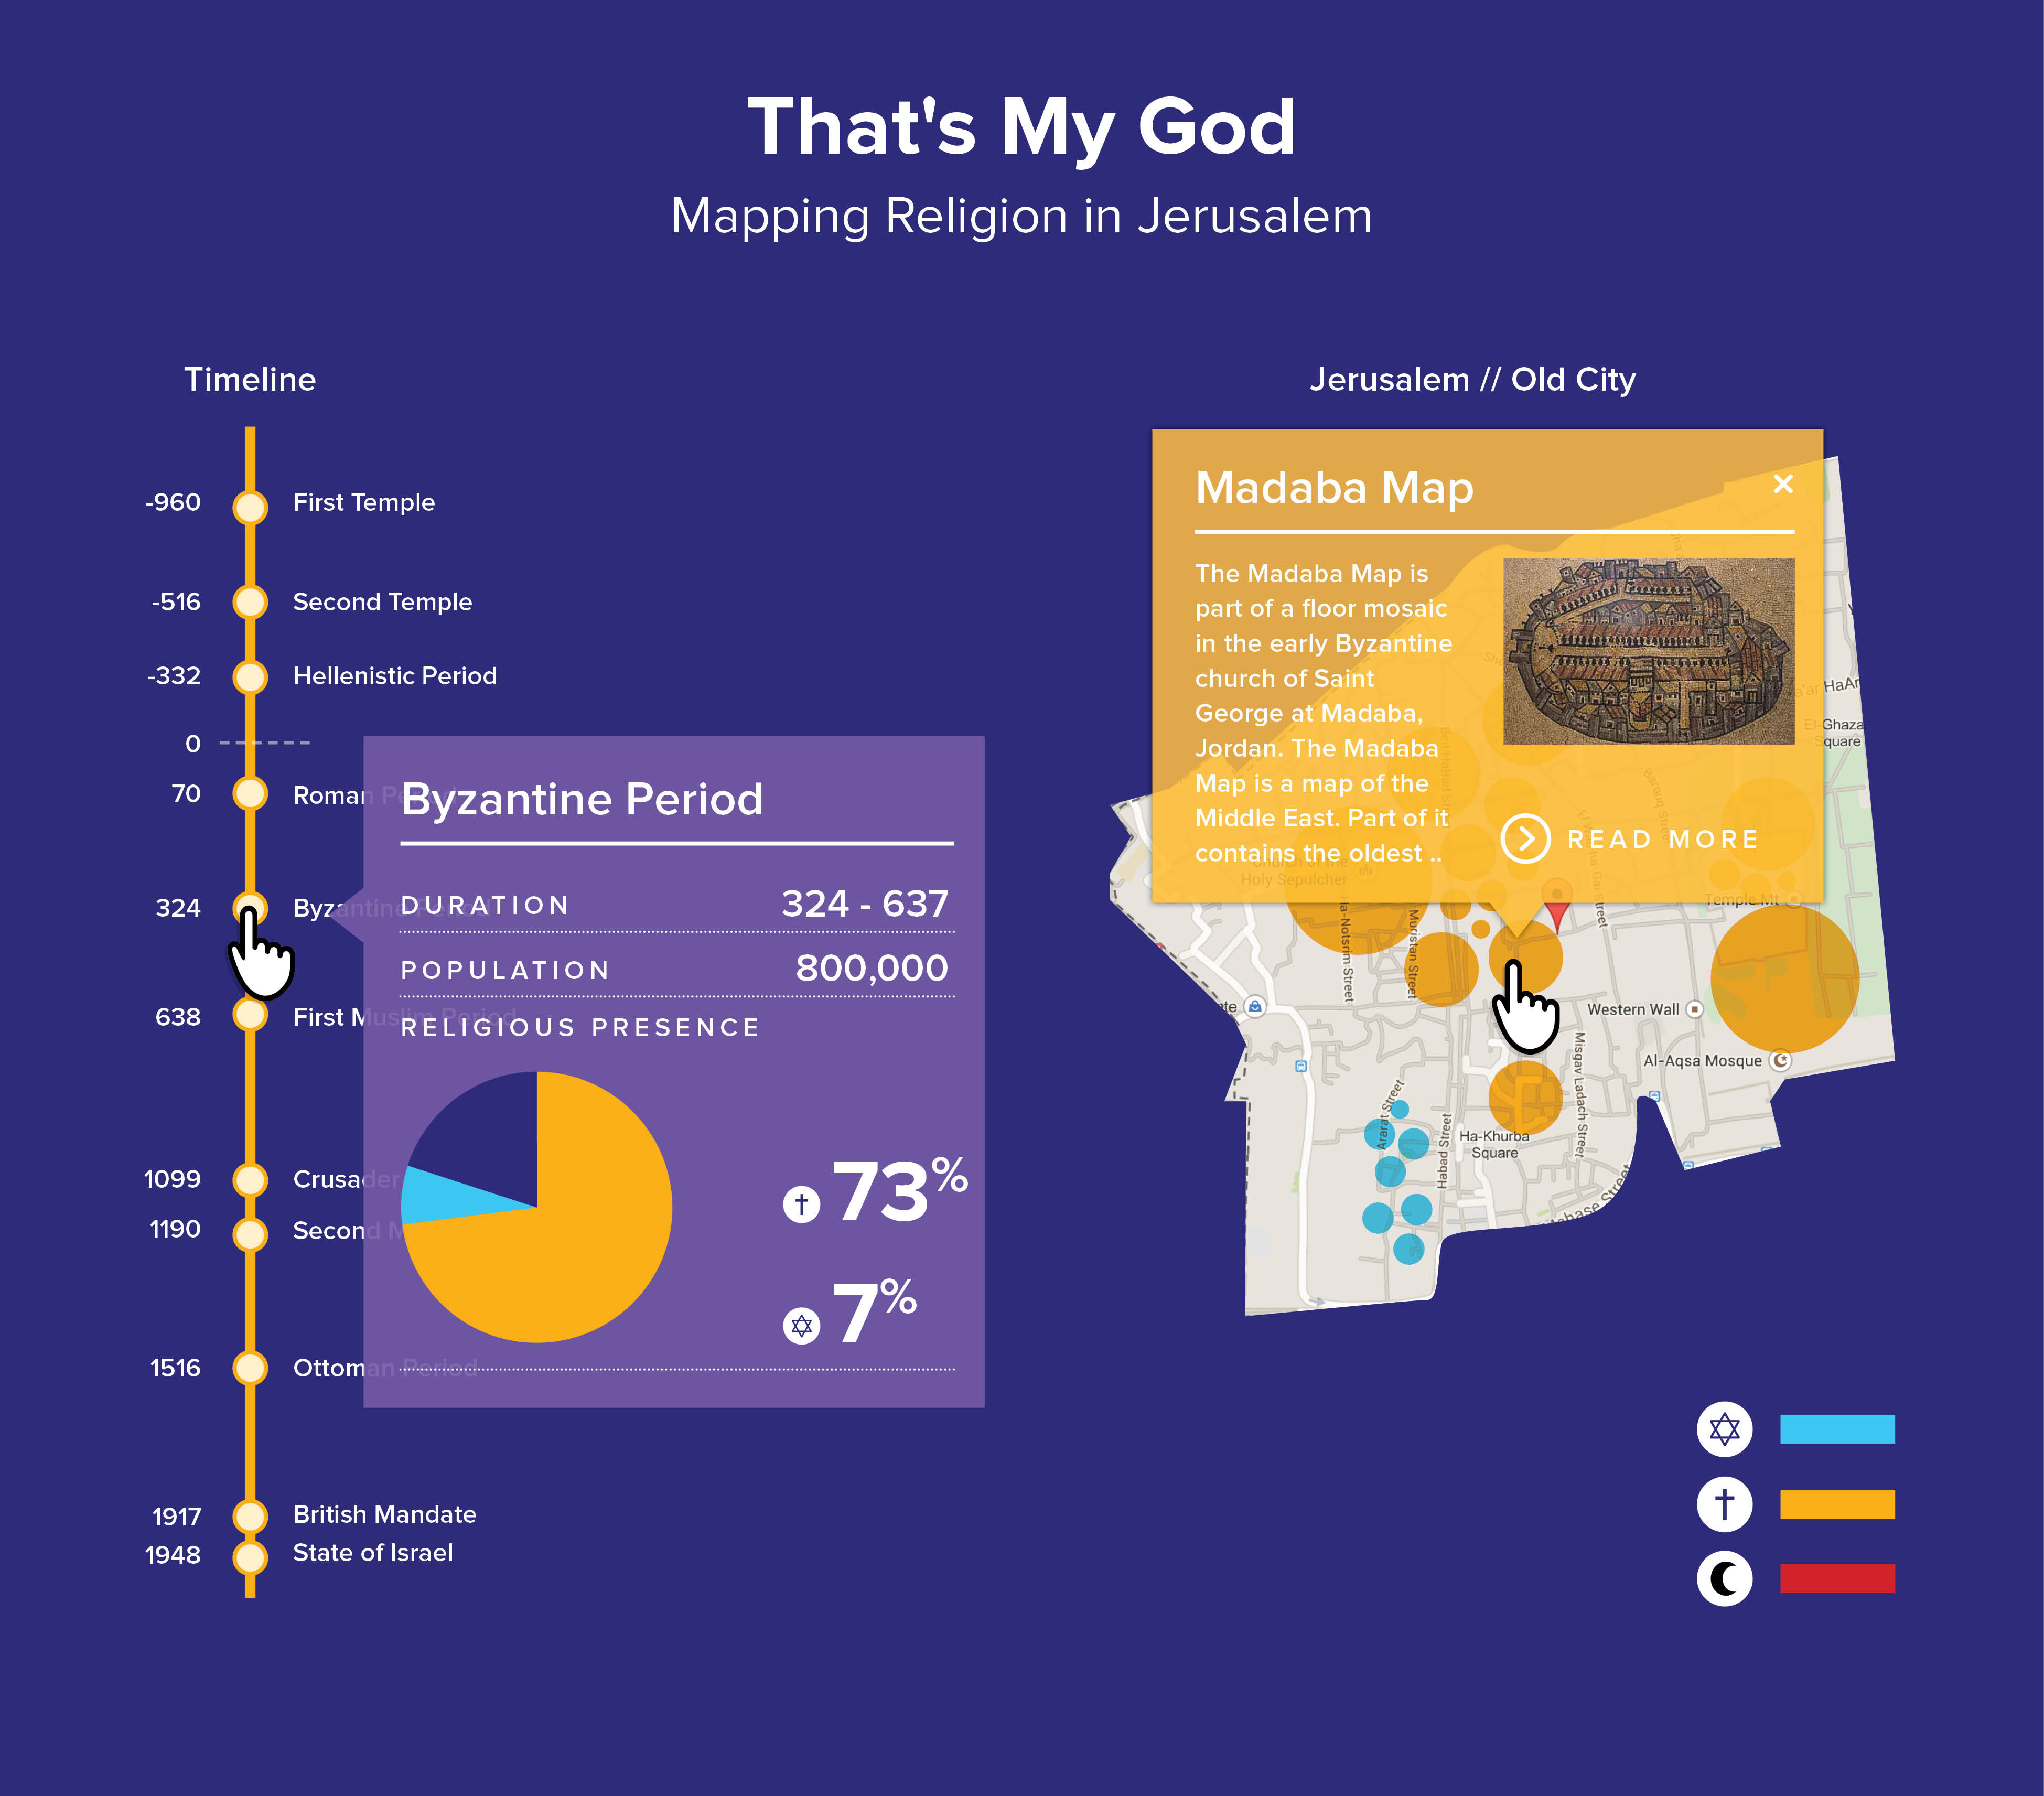
Building an online class library is not as simple a task as I had initially imagined it to be. There are so many details that relate to the young audience’s scholastic capabilities that differentiate such a platform from many other content-browsing and uploading sites out there.

The trickiest issues I’ve encountered in creating an online class library for young students are:

  1. figuring out the balance between browsing content and creating content
  2. building a system for creating content that has been approved by the teacher and ready for review by fellow students

A few weeks ago I got to conduct some user testing for screens I had developed.

UX-book-review-6-@2x

UX-book-review-7-@2x

UX-book-review-8-@2x

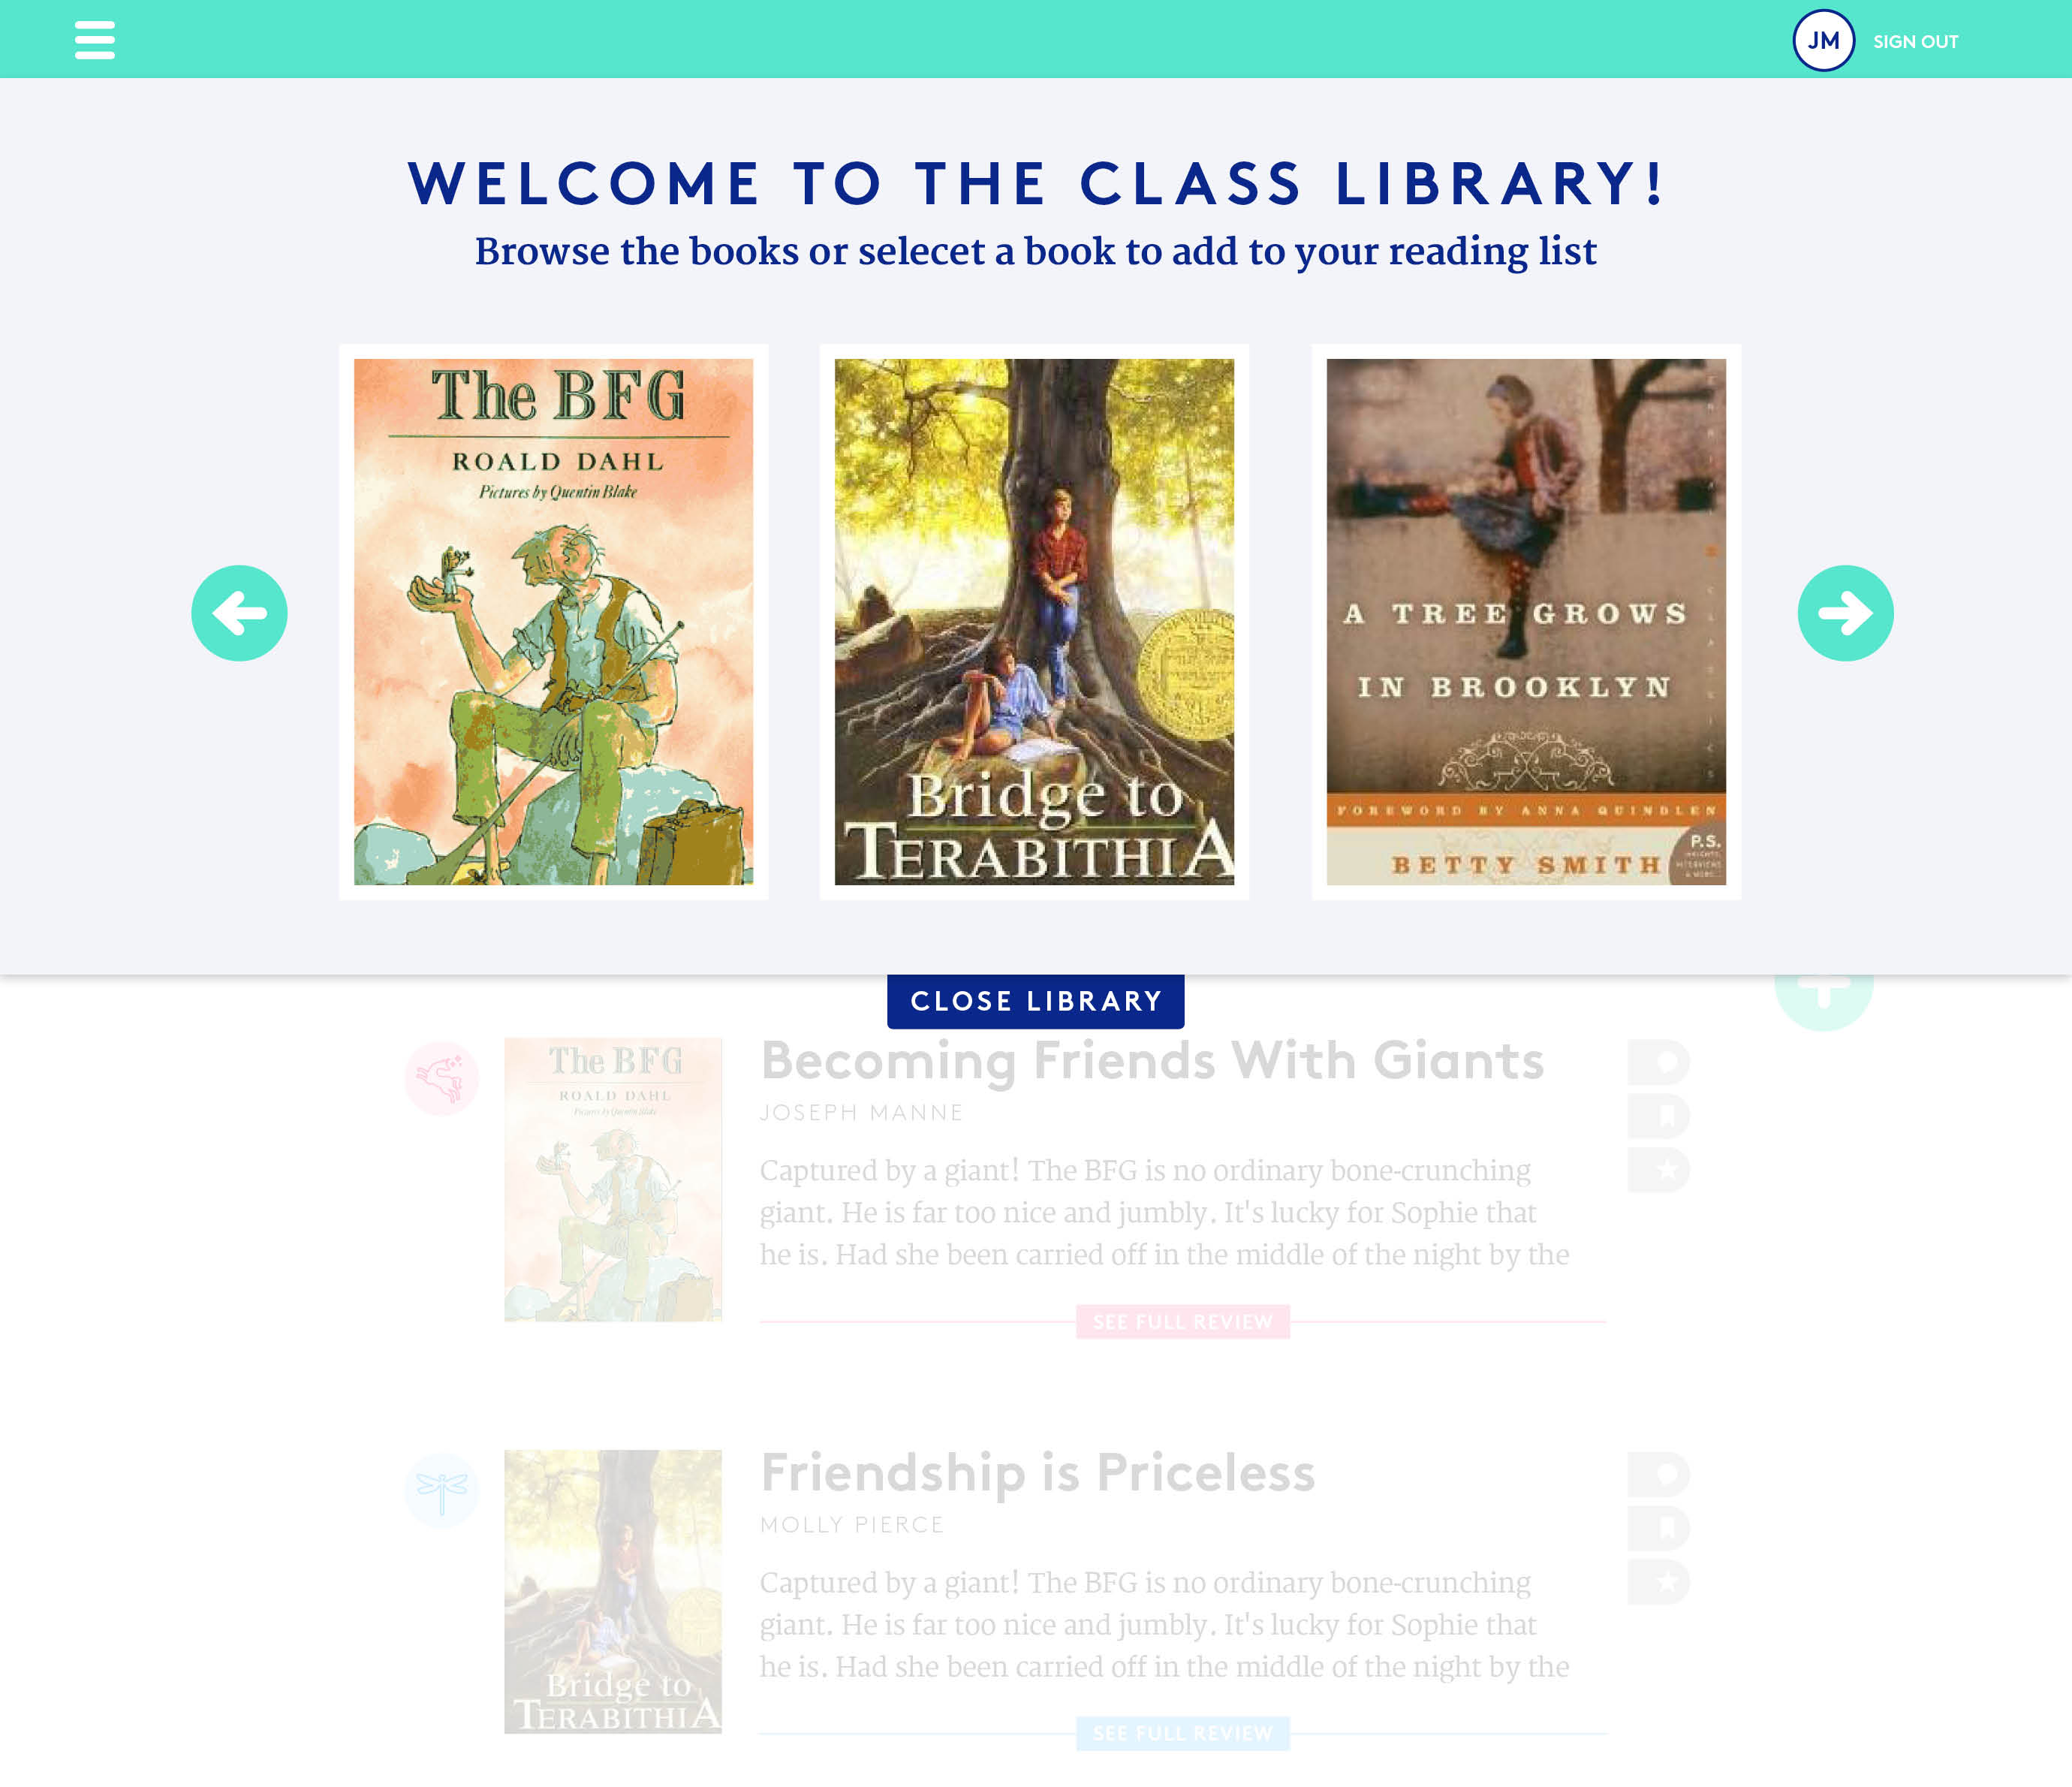
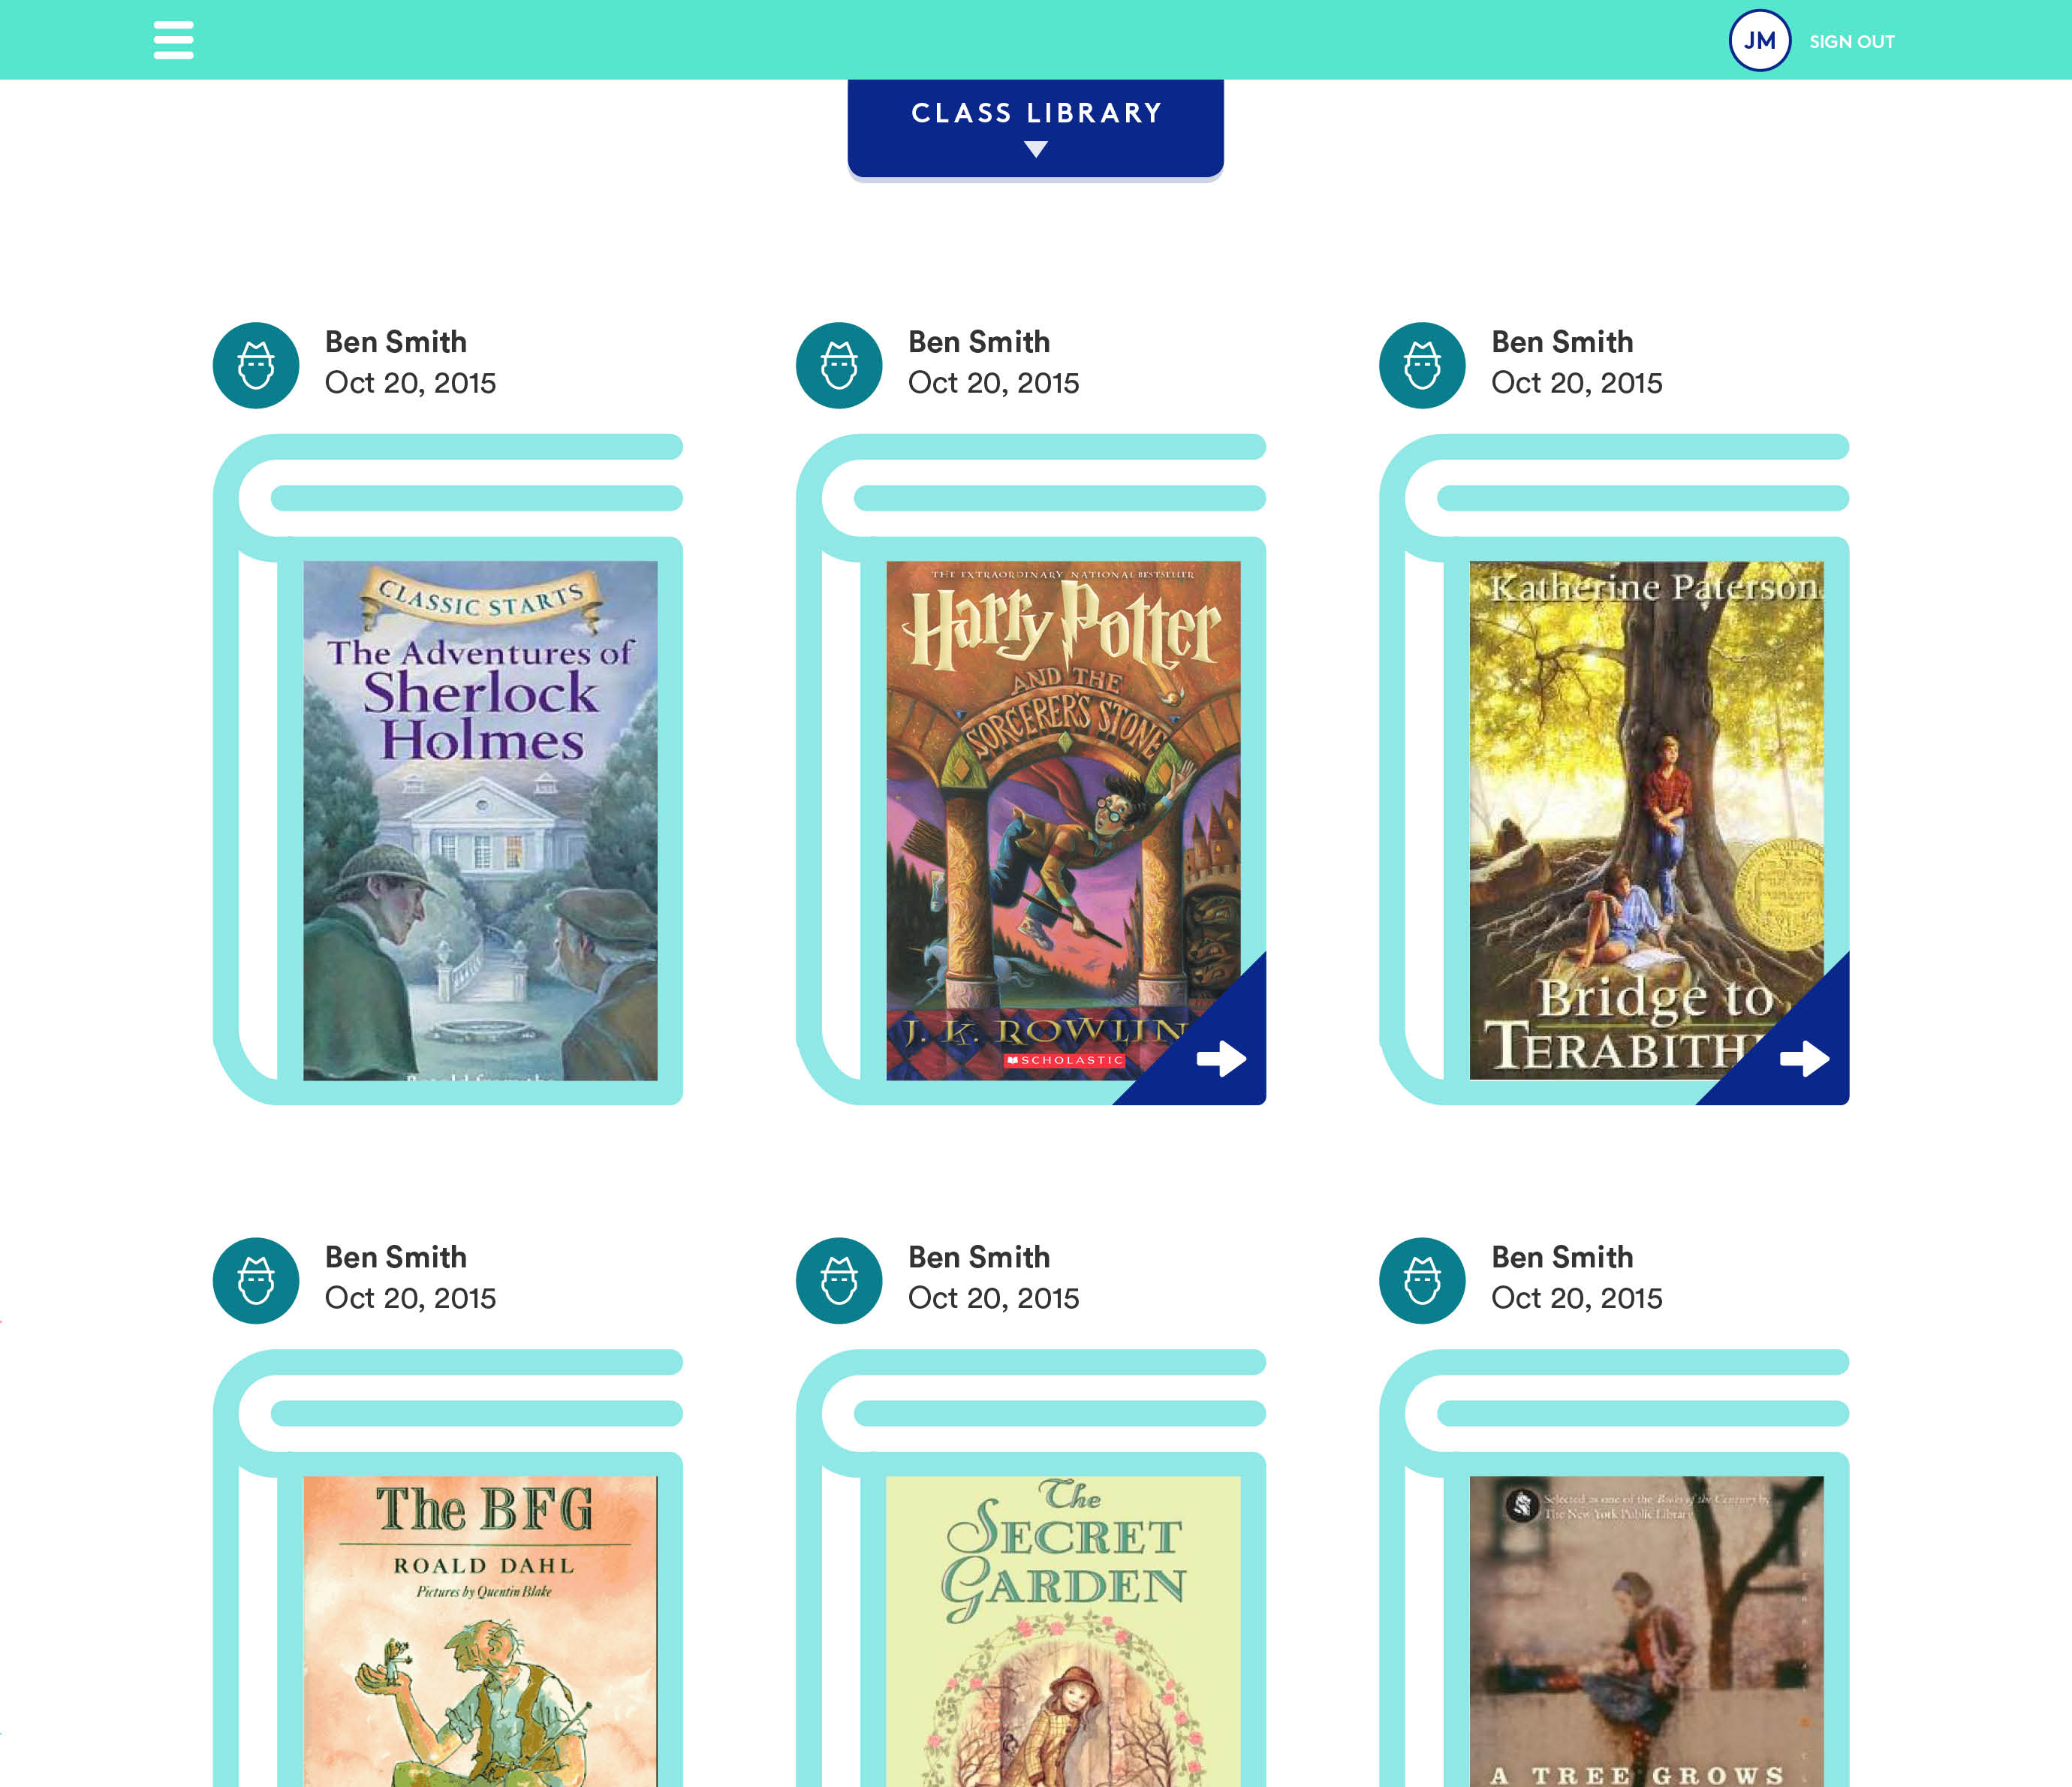
The site I created is built in a way where the teacher is the main admin, who then invites students to join the class group online. The students have their own login, but have limited access. As far as uploading goes, the conclusion I have come to is to have the teacher be the middleman between the student’s content upload and actually having it published on the site. In other words, when the student wishes to upload content, it is sent to the teacher, who approves it and triggers the actual “publish” action.

The flow for uploading content has been a huge question mark, but I think I may have cracked it this week.

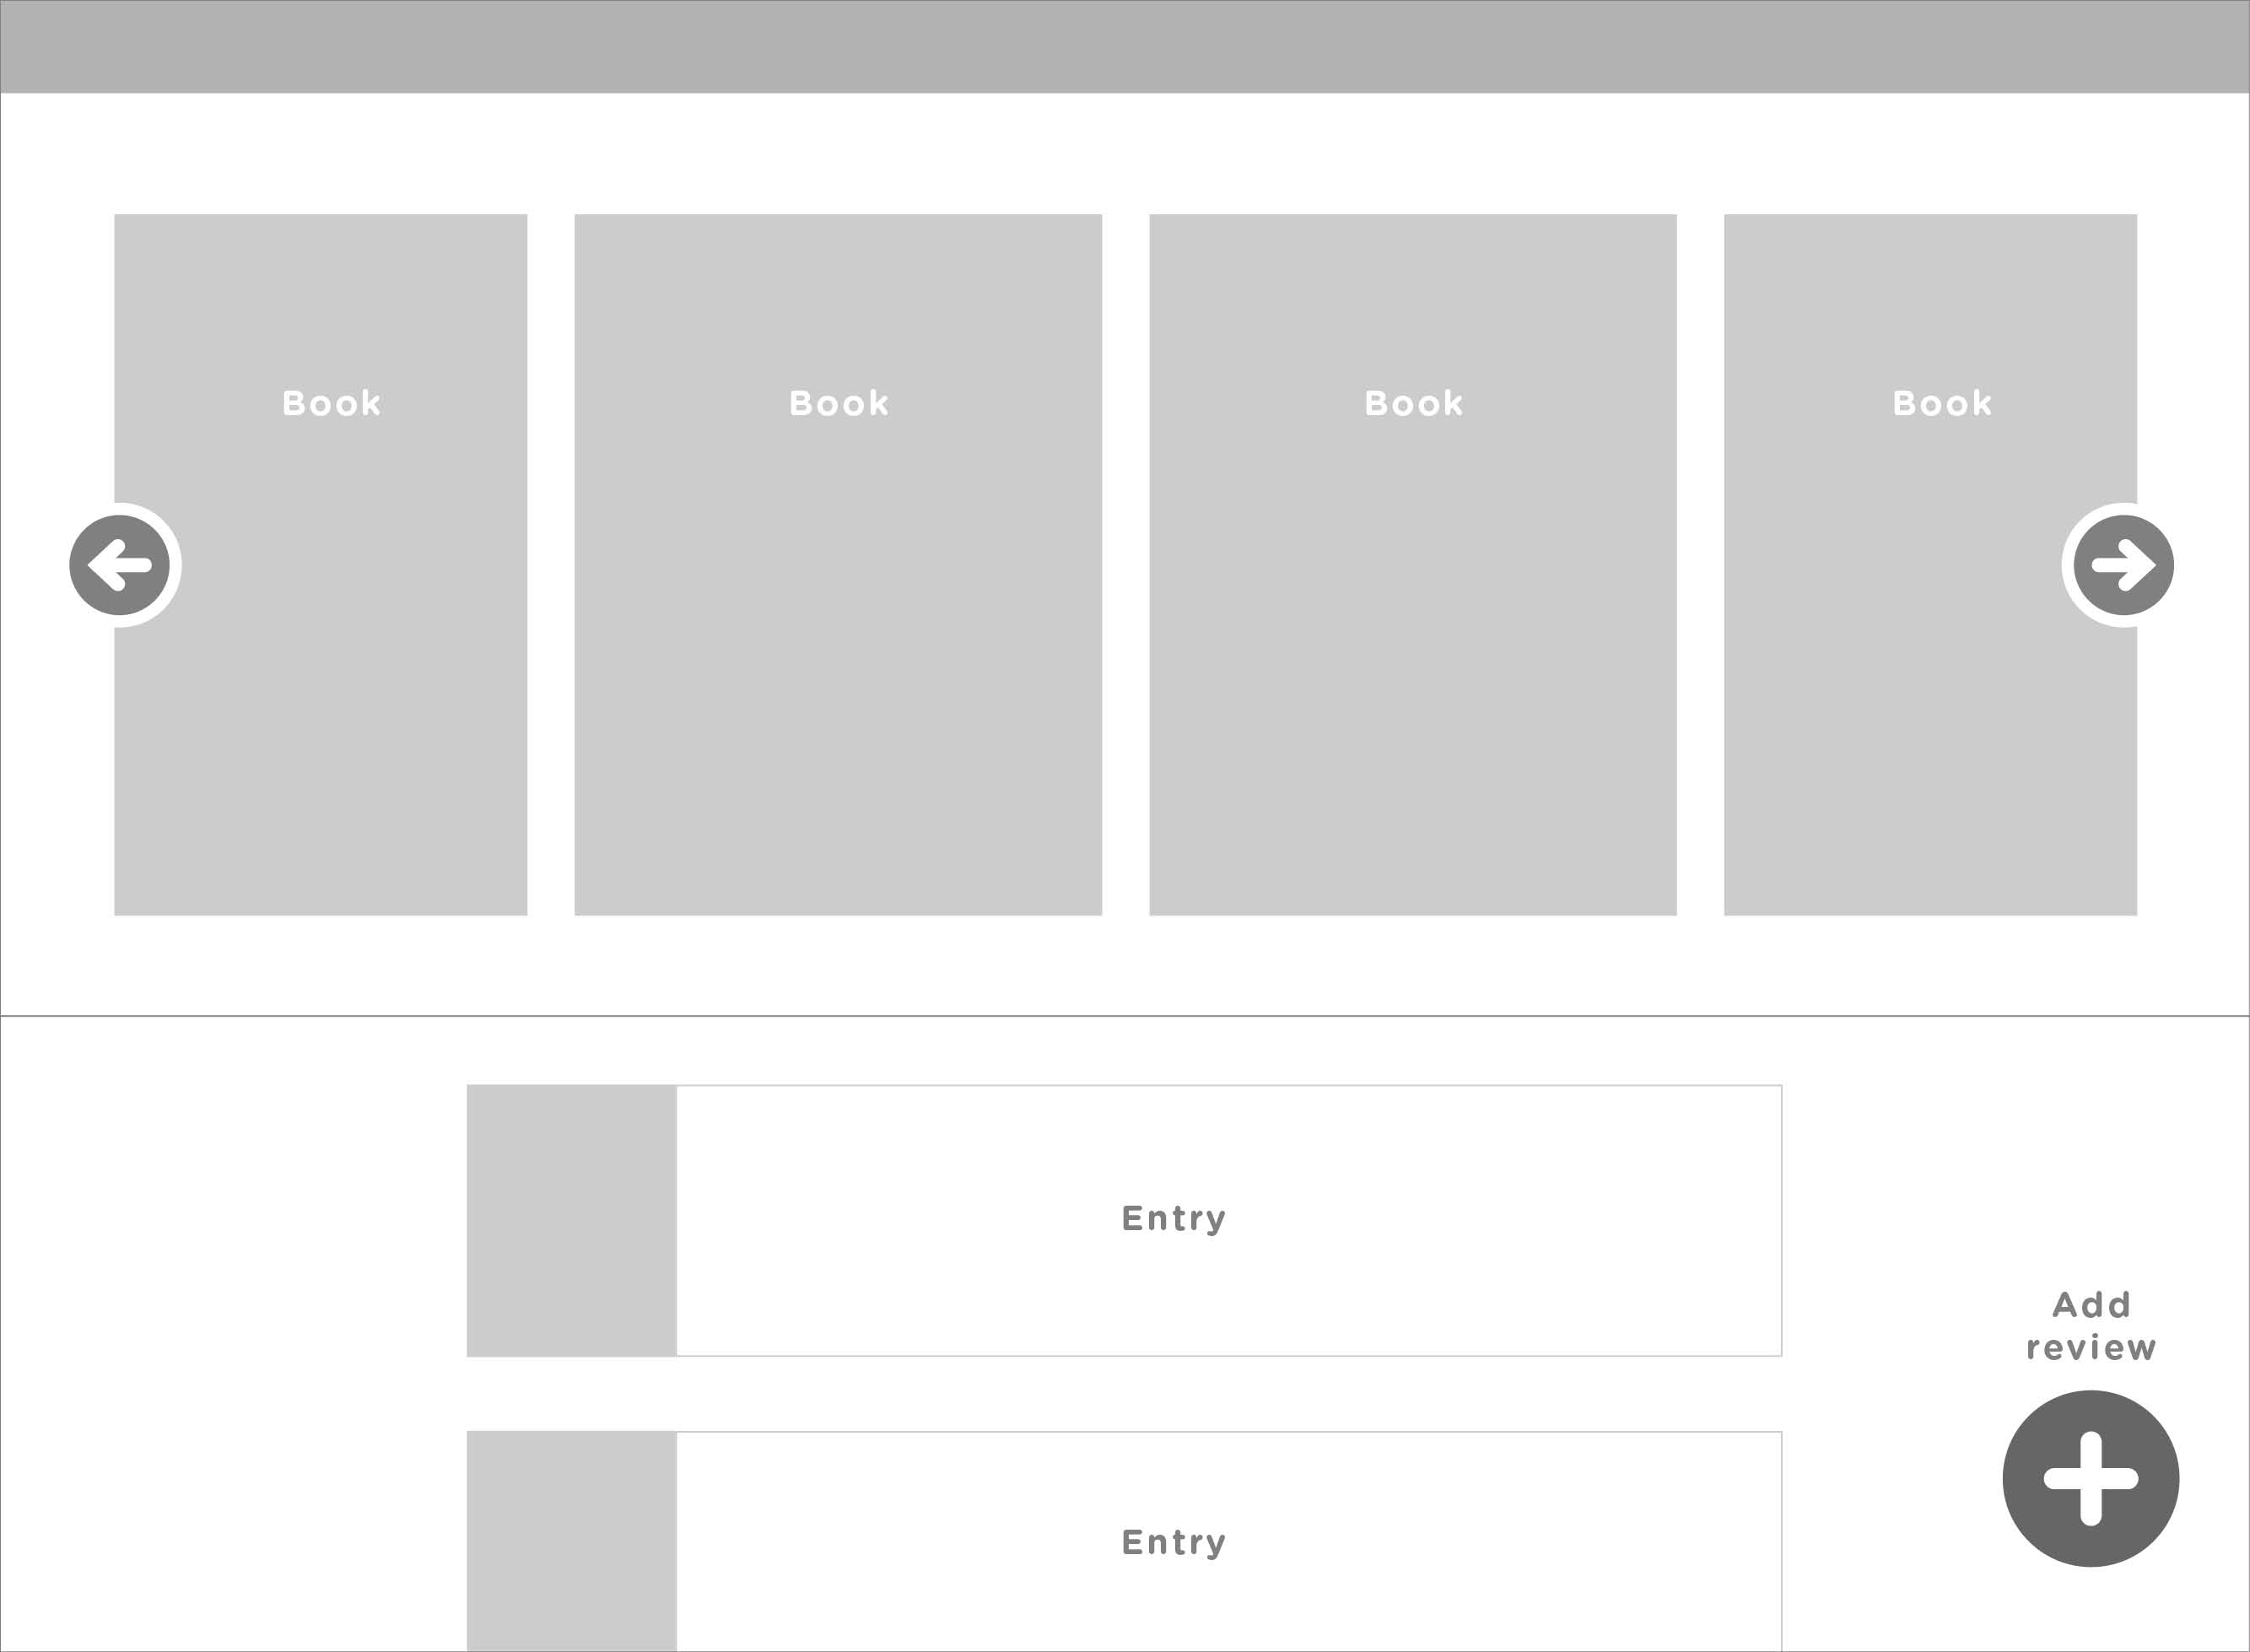
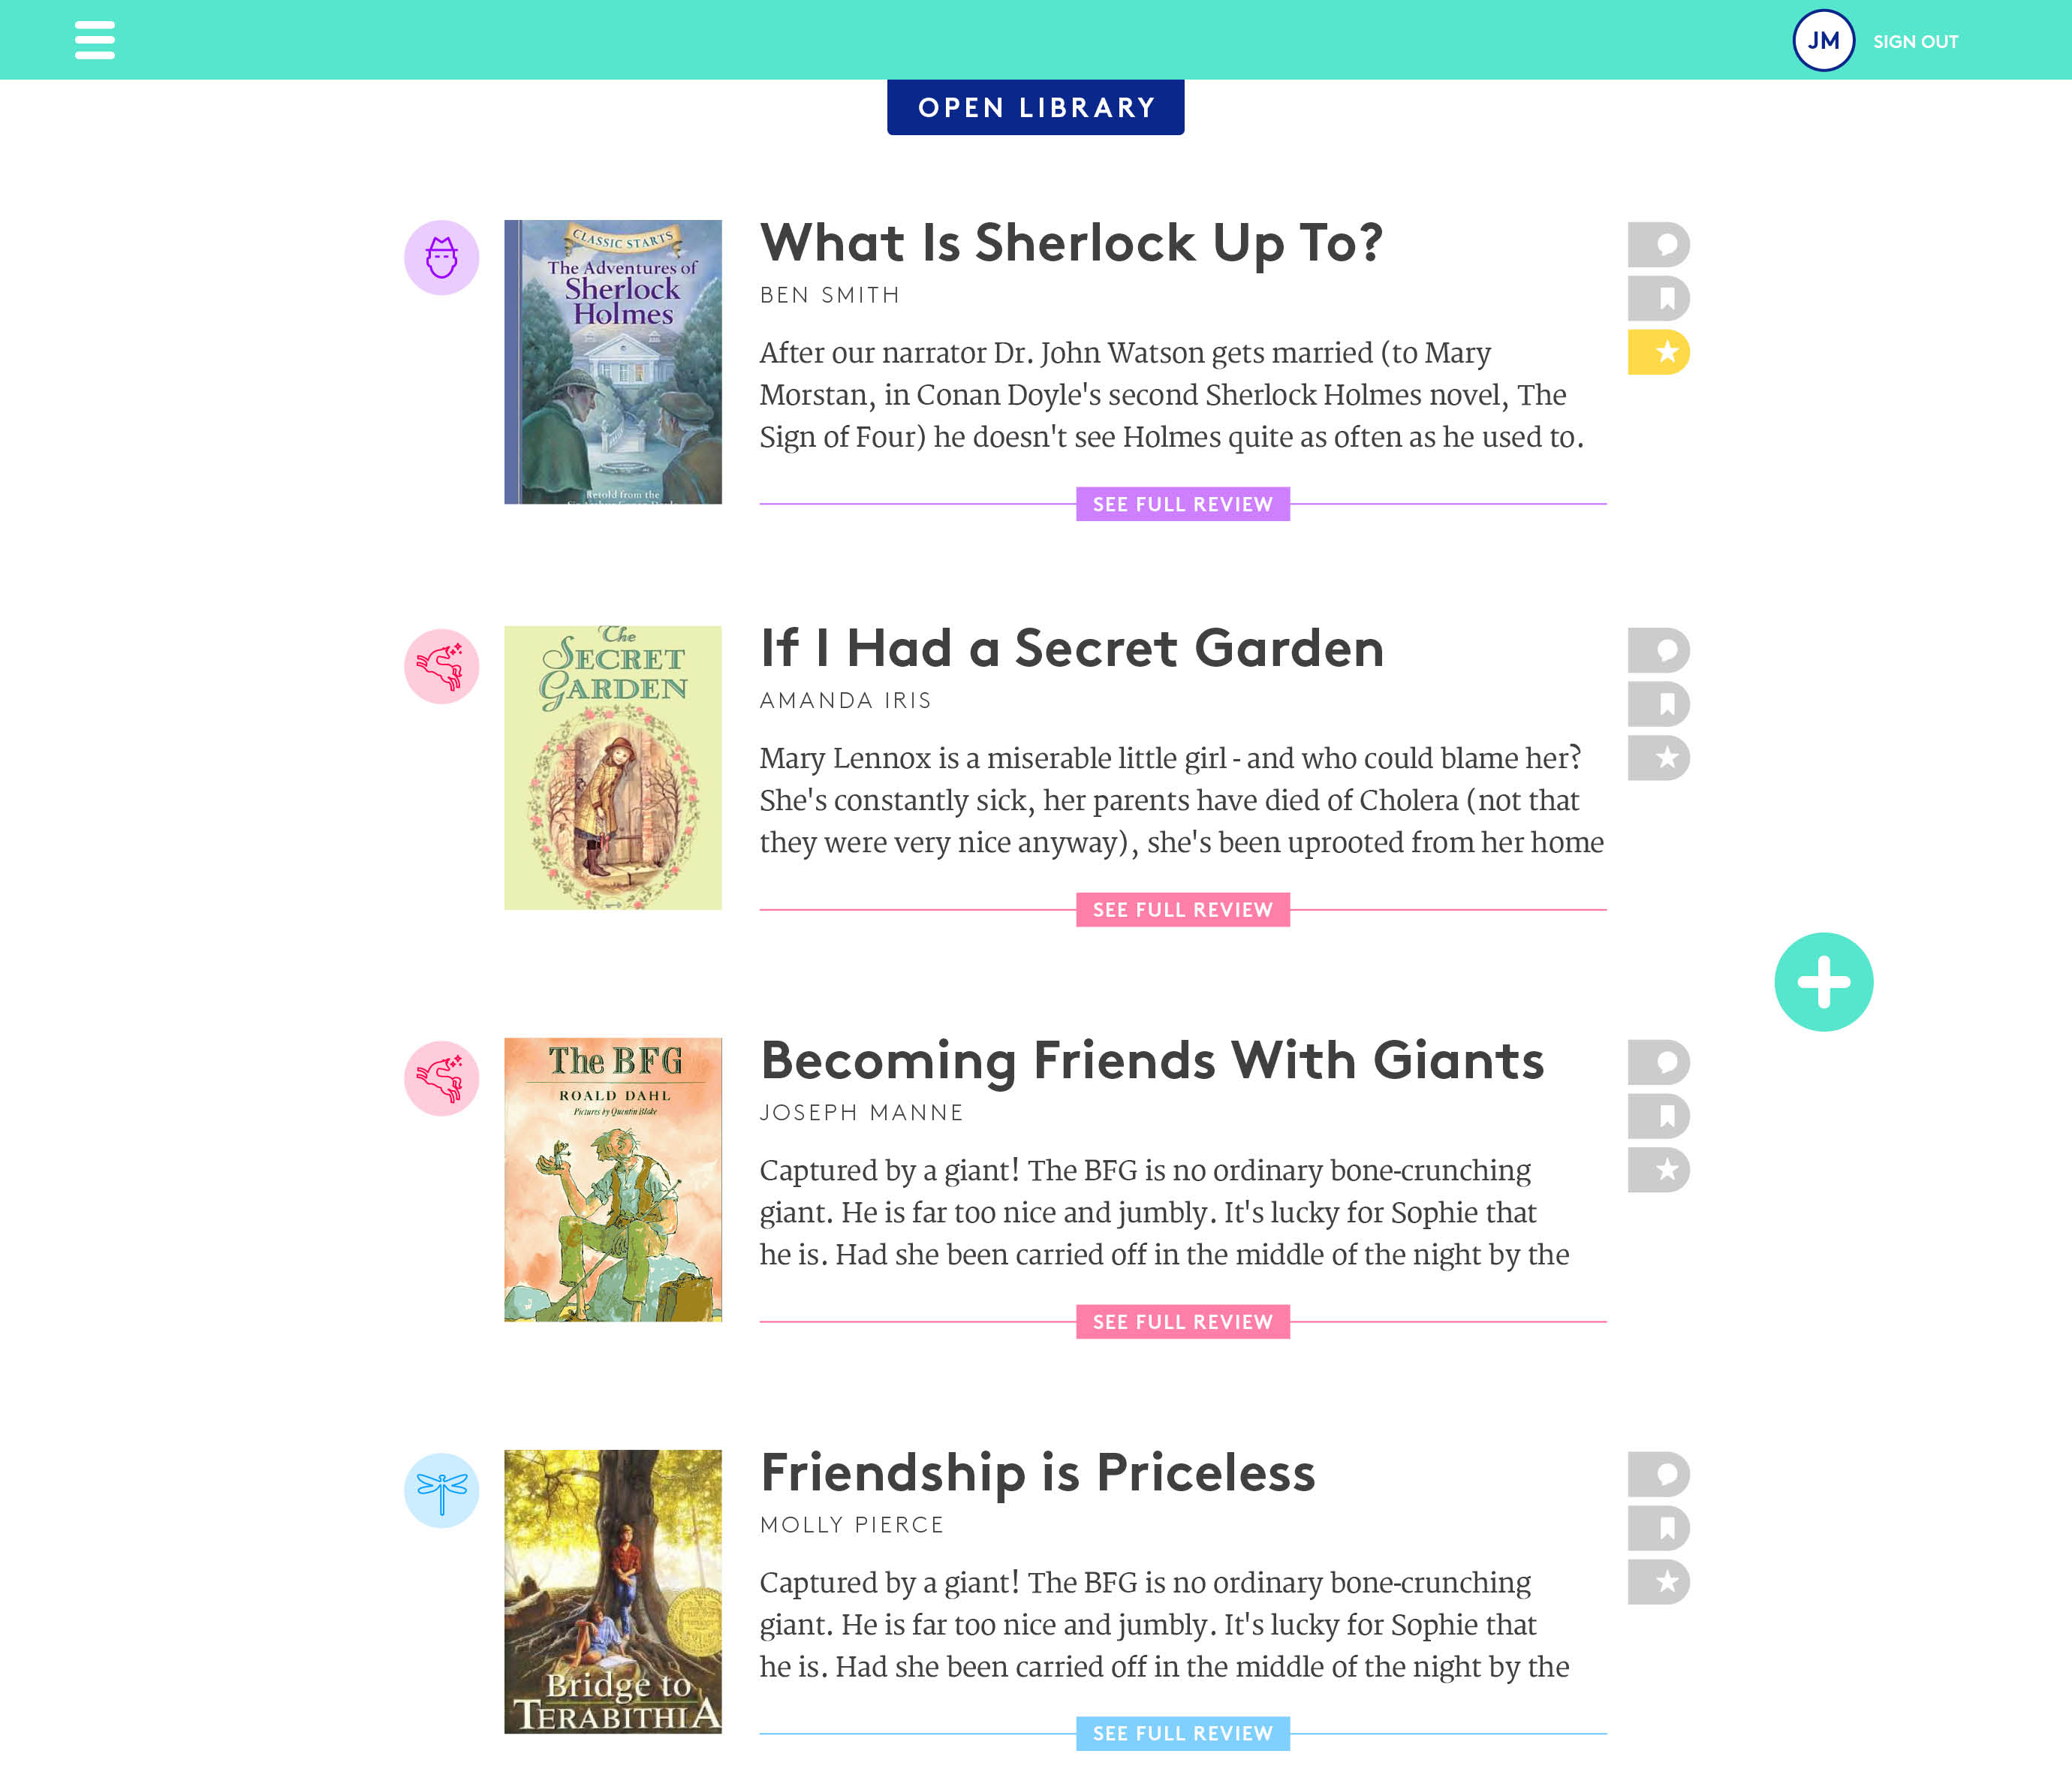
Some points that were brought up in the user testing session were to possibly change the entry view to be more iconic rather than textual. I agree that having an image of a book that triggers the students to click and dive deeper to the review is probably a more user-friendly experience than the text-based view, which may seem intimidating to students of such a young age.

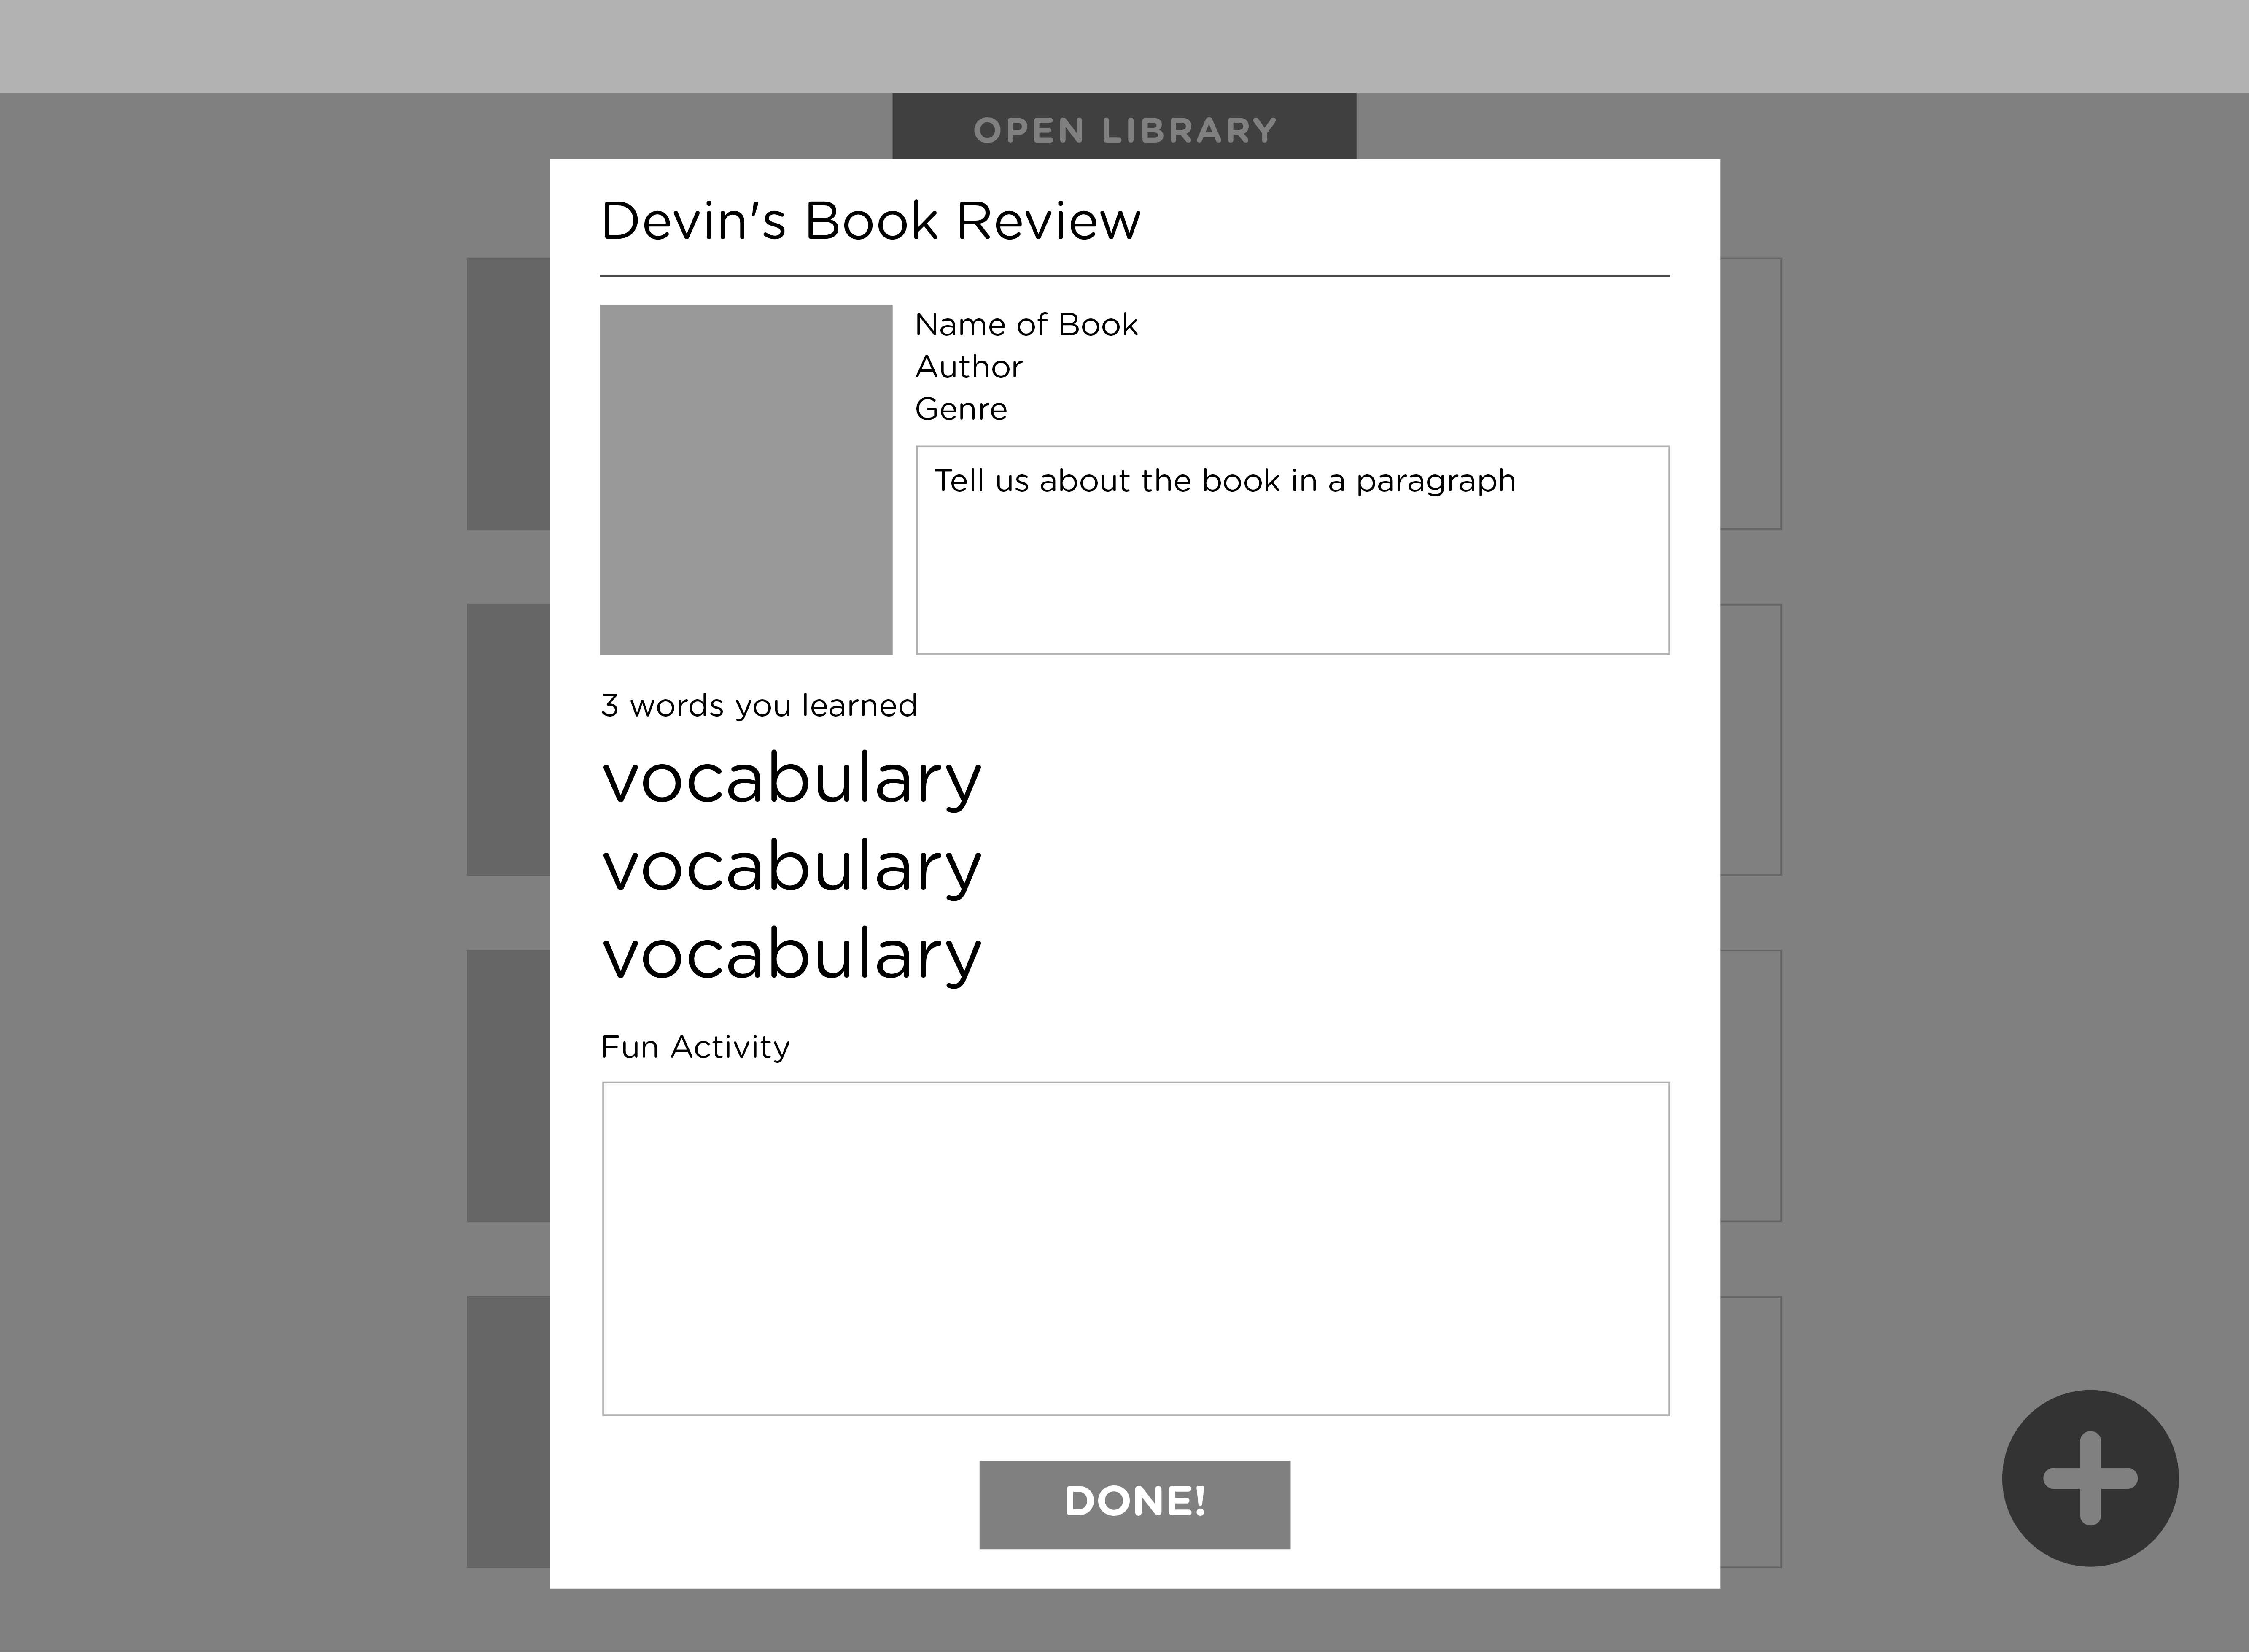
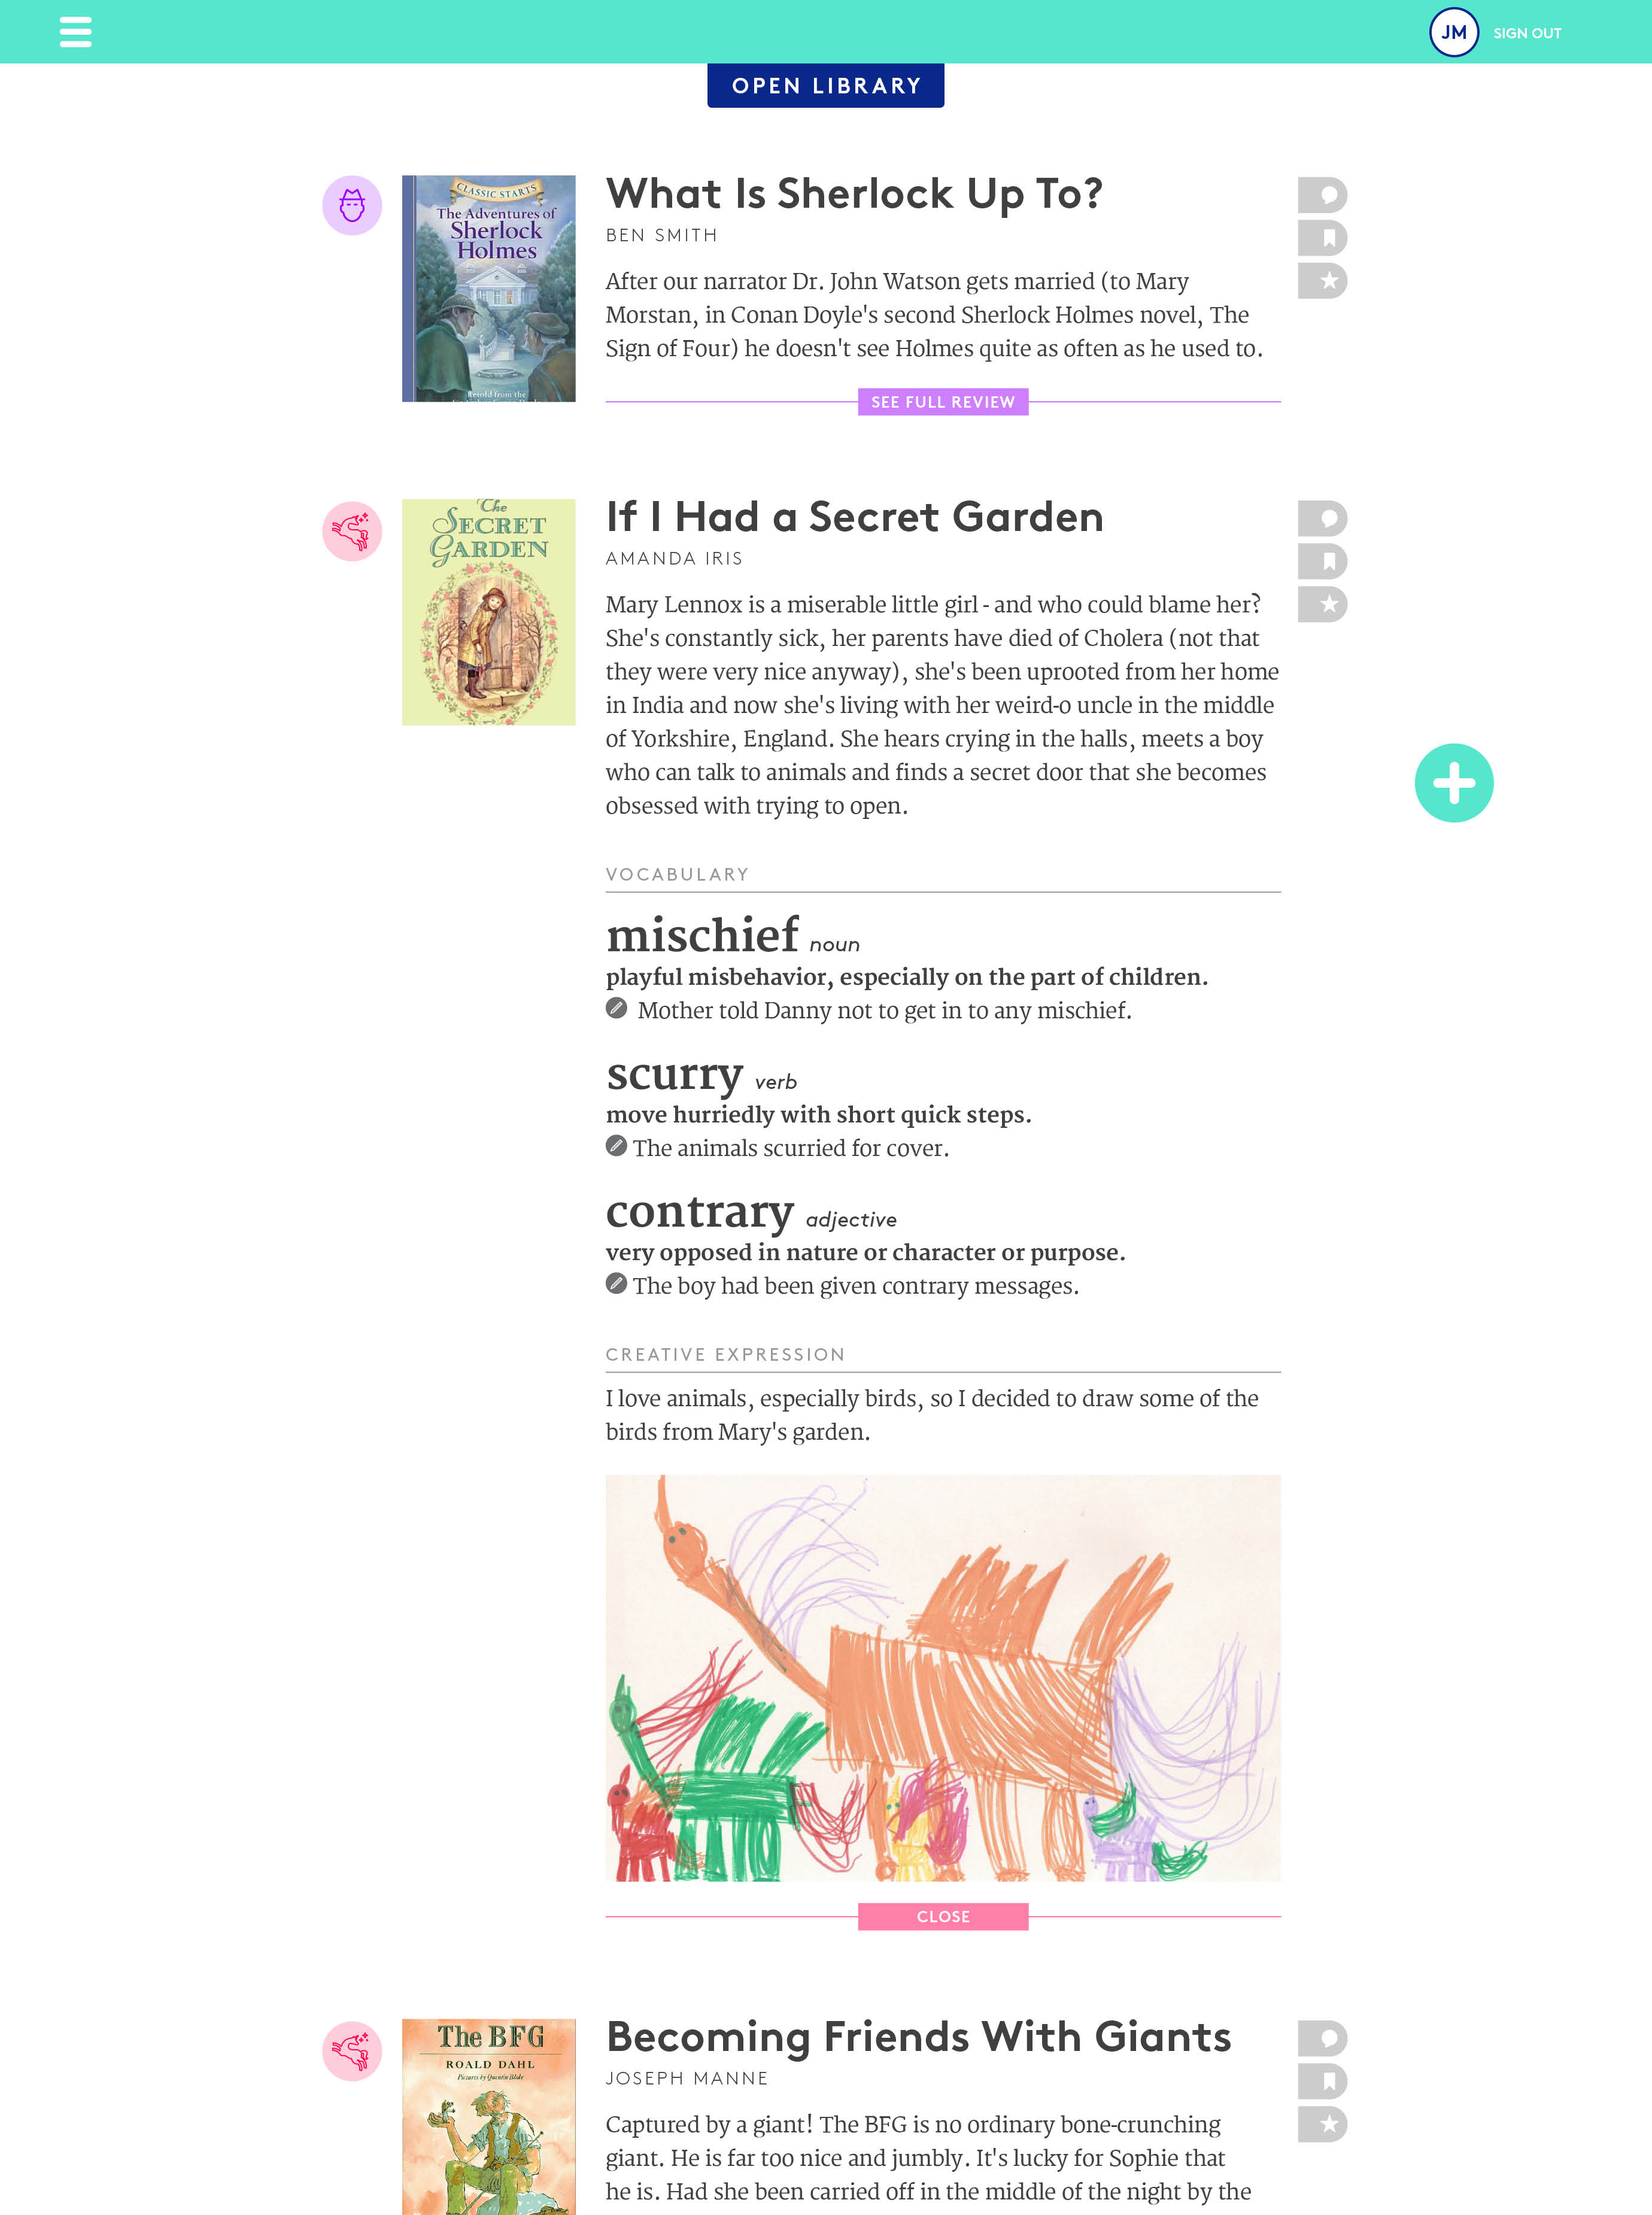
It was also mentioned that the idea of having post expand and collapse on the same page may be not be focused enough. An alternative suggested was to have the students click on an icon of a review that would direct the to a separate and focused page of that one review.

Another thing that was addressed was to refine the language of the site, and to perhaps address to various parts and actions in a younger tone of voice.


After taking these and other notes in consideration, I came up with an alternative layout for browsing between book review entries:

UX-book-review-Thirdtrial18

UX-book-review-Thirdtrial17

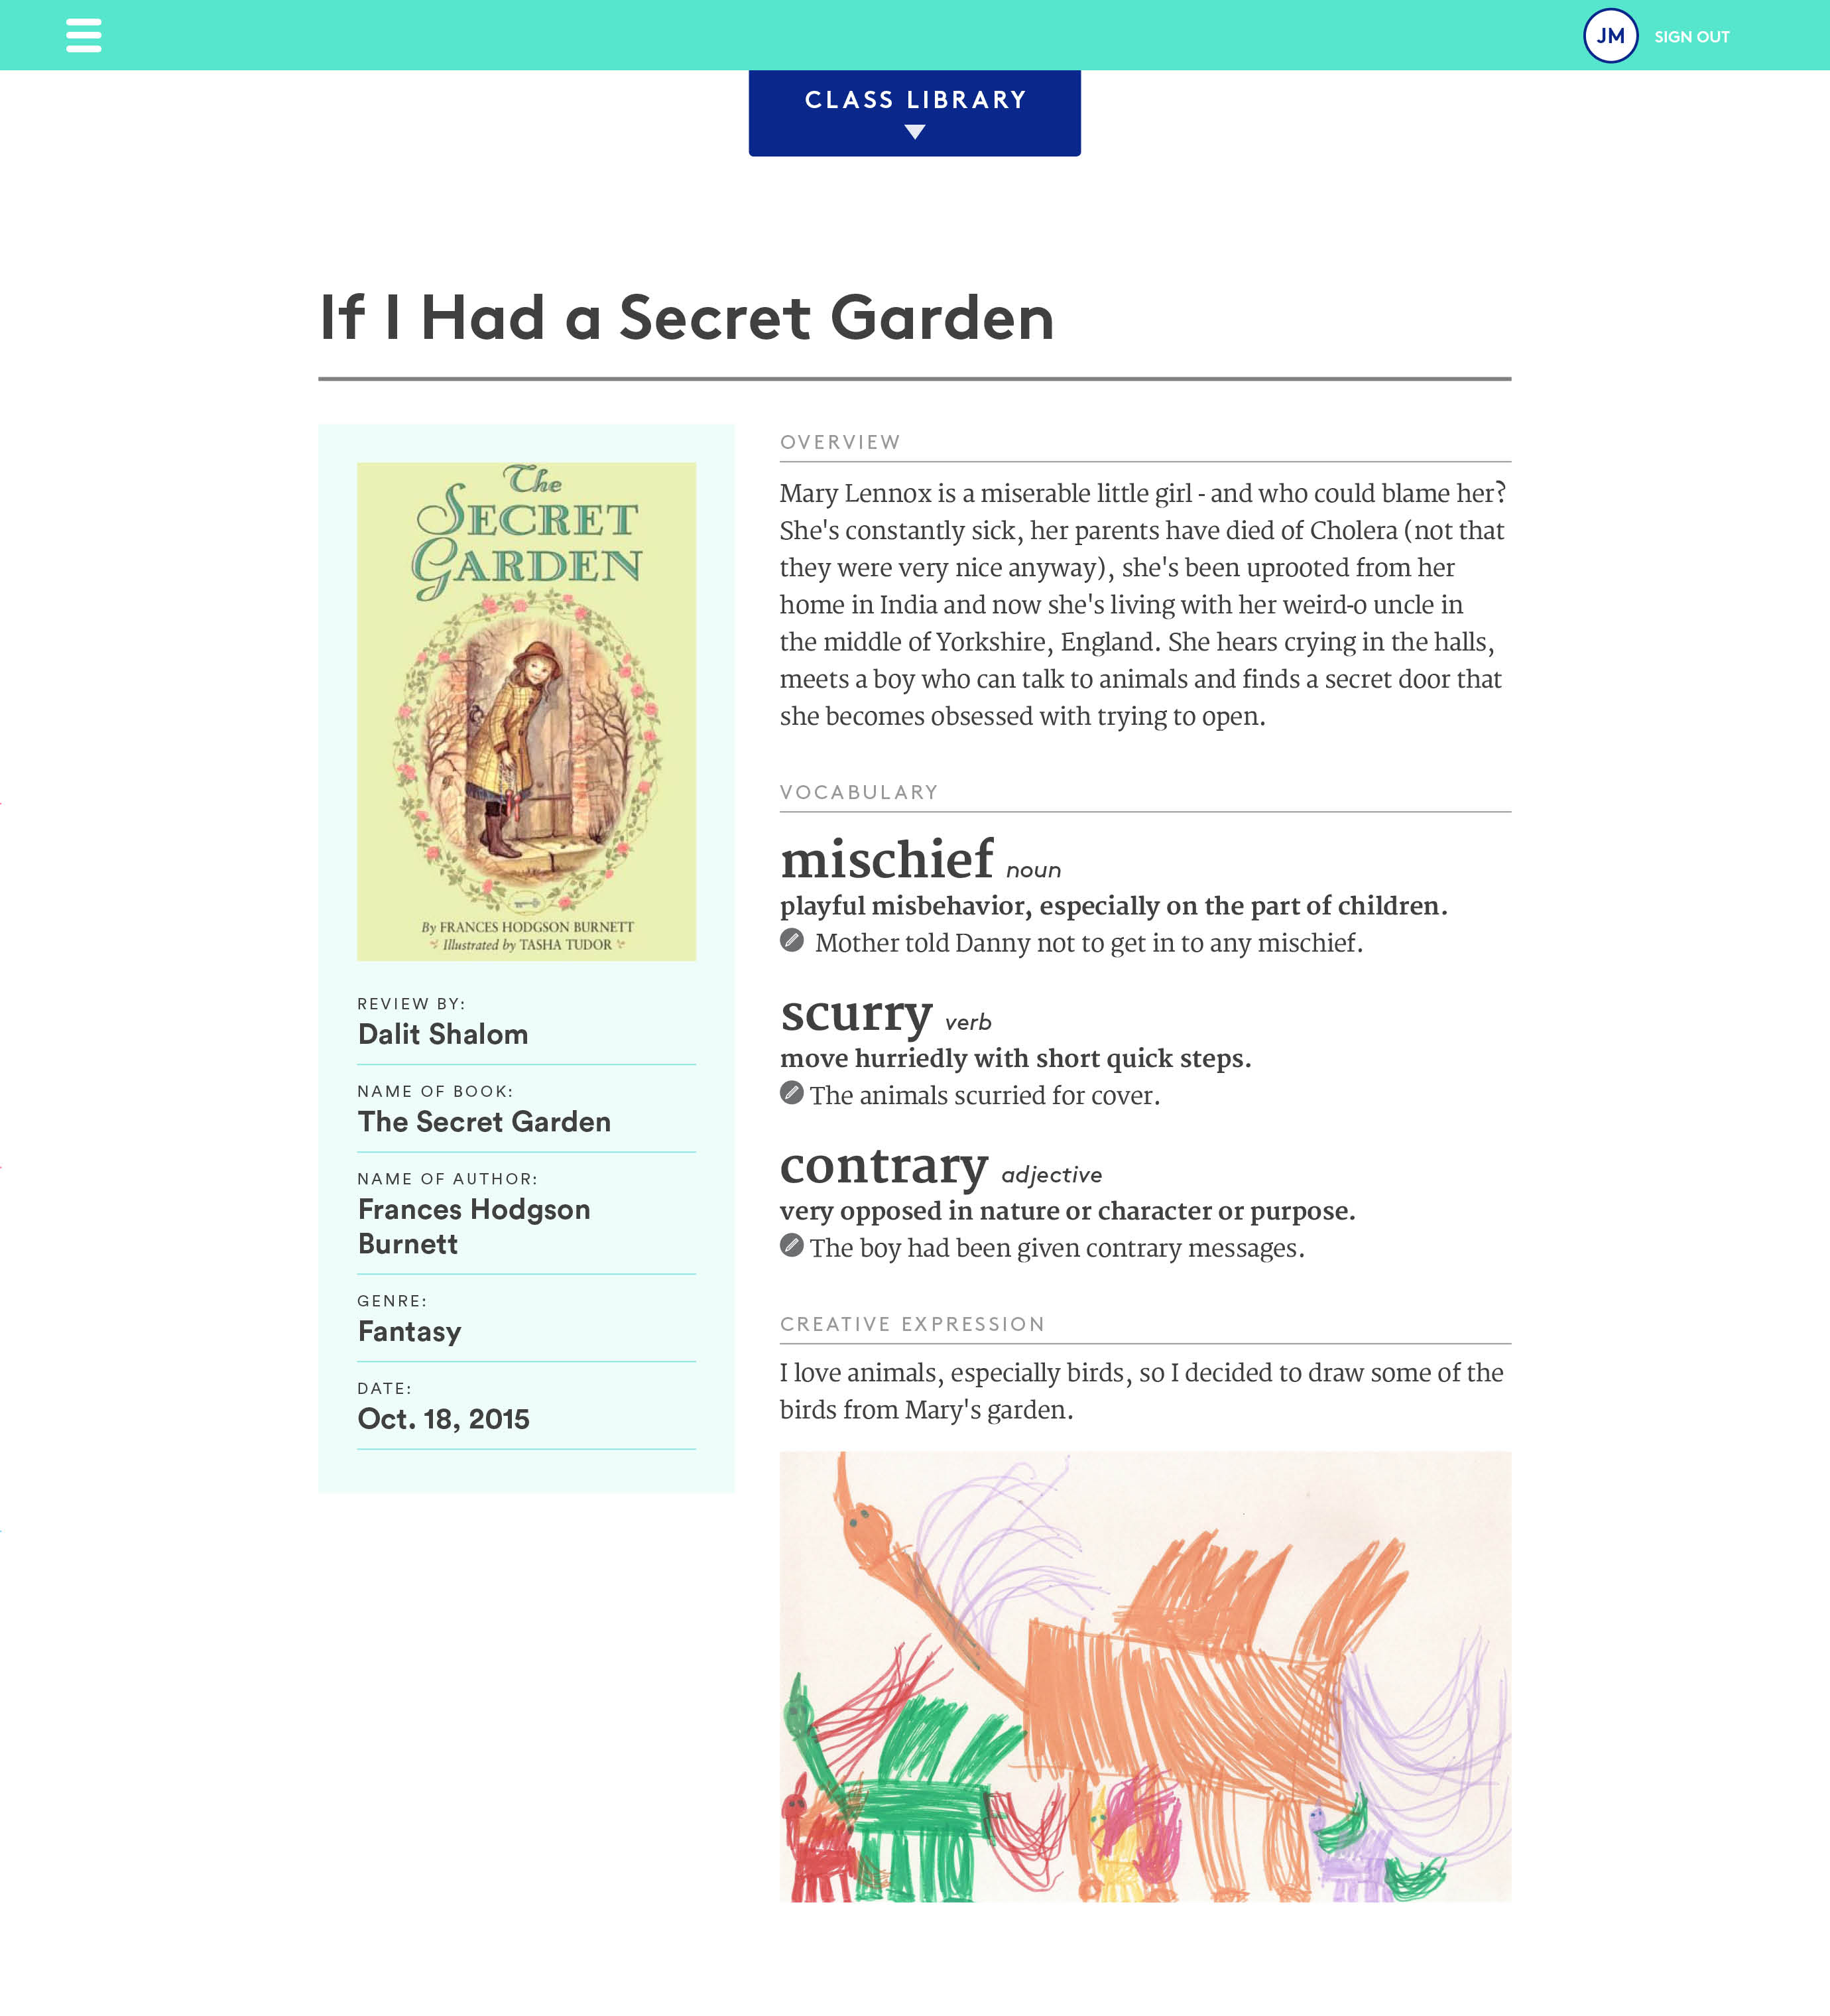
This layout also gives a quick view of the book’s details, such as title, author, and genre. As for the content upload side, after speaking to Kim, we decided that an “offline” worksheet that would then be uploaded to the class library would be the best solution. The worksheet would be corrected by the teacher and after the drafts and corrections, the student would upload the “answers” that would then be generated to a post for viewing by the class.

What will this worksheet look like? How long will it be? How will the teacher make corrections on it? And how will it be uploaded to the class blog? All these questions are yet to be answered, so stay tuned!

Virtual Tour of Amphitheaters in Italy

Leave a comment
Mapping and Data Viz for the Ancient World

For this assignment, I’ll be creating a virtual tour of amphitheaters in Italy, and allowing the user to visit external links, such as Wikipedia to find out more information on the specific location. This will be put together using CartoDB and Odyssey.js. To do this, I will create a subset of data from the main dataset of Amphitheaters, turn that subset into a geoJSON file, upload it to CartoDB, clean it up and perhaps add some more columns, and then use it in Odyssey.js which will publish an interactive link of the journey.

How To Build a Greenhouse

comment 1
Subtraction

I’ve been cooking with fresh spices since the day I learned to fry an egg. Nothing beats fresh basil as a topping for pizza, or snipped fresh coriander to dash a warm bowl of curry. The downside though of fresh spices, is if you buy them packaged from the supermarket, it only takes a few days in the fridge for them to start looking like this:

BDM-bottom-leaf

So, it has been my dream for a while to build a small house for these guys to grow in that could fit in an NYC micro-size kitchen. I started out by sketching a few design ideas. I have a fetish for modular furniture, and this seemed like something that could potentially be stacked one on top of another. However, after speaking to Ben about this project, an idea come up to make half a green house, so that two halves would make the full greenhouse.

IMG_8345


The materials I thought would be good to use were plywood and clear acrylic for the windows. Glass crossed my mind as well, but since I envisioned making holes on one of the side for the plants to breathe, I thought acrylic would be better. Here are the parts I planned for cutting on the CNC:

greenhouse-parts

After planning these out, I went to get some wood and start cutting these parts out!

IMG_8354

IMG_1589

IMG_1650

Once the wooden parts were cut, it was time to make the acrylic parts that would sit in flushed to the pockets created in the wooden frames.

IMG_1328


IMG_1326-cropped copy


Once all of the parts were prepared, it was time to assemble everything together! But before gluing the wooden frames together, I wanted to make sure the sides would be super-durable, so I drilled holes for wooden dowels on the sides. This was done by using a dowel jig, so that the hole for the dowel is created directly in the center of the plywood frame (and, the wood doesn’t split!)

IMG_1658

IMG_1659


Once those holes were drilled, the glue went on, the dowels went in and the clamps held everything together. After screwing on some last bits, my greenhouse was finally born!

greenhaus-3 copy

greenhaus-4

greenhaus-5

greenhaus-6

Joining Joints

comment 1
Subtraction

Two weeks ago we were given the challenge to create joints that connect with one another. This might sound like a trivial task (it did to me in the beginning), but actually, it’s not. When creating pieces that are meant to fit together, it’s important to remember that even though in theory it makes sense that these two pieces will just naturally fit into one another, in reality they most likely will not.


piece-1

Every material has a different tolerance, which means that every material will need a different negative space for the positive piece that will be inserted to it.

This is an sketch of what I attempted to make:

single-piecing-bit

And, ideally, I wanted these joints to be possible:

many-piecing-bits

The material I used was plywood, so I knew that I would have to make the hole a bit bigger for the piece to fit in. Assuming this would be my biggest issue, I went ahead to view my file on MasterCam, however, the preview kept showing me problems if I were to go along and cut my file on the CNC. All the issues I was having had to do with misinterpreting the path of the drill bit and it’s abilities to produce straight shapes as opposed to rounded corners. This is a bit hard to envision at first, because when we think of cutting a straight line, that’s usually a very trivial task. With the drill bit though, you always have to remember that it can’t cut anything with sharp corners, because the bit itself is actually a tiny circle. So, areas like this are virtually impossible to cut using the drill bit:

single-piecing-bit-line


So since those corners actually came out rounded, you can imagine that it is impossible for the rounded corners to lock into the joining parts where the corners there are sharp. Conclusion? The design should have round corners everywhere. By the time I had realized this it was a bit late to cut these again, so I ended up sanding the corners down:

IMG_1090-cropped

This ended up taking a lot longer than expected, but the pieces successfully linked together!


Book Reviews, Not Reports

Leave a comment
Project Development Studio

Over the past two weeks, Kim and I had some discussions on the structure of this project. The more we discussed “structure”, the more we realized that this entire project and it’s components are all built on structure. The system diagram I created illustrates that on a broader scope. As mentioned earlier, we see this site as an online class archive for books that have been read by the students and their reviews on them. So a student entering the site could either browse existing books and reviews (and take certain actions, addressed later), or, upload his/her own book review. This latter of these options is the one I’ll focus on first, along with a few very quick sketches (more detailed wireframes will be discussed next week).

UX-book-review-1

UX-book-review-12

To create a book review, the user would click on the prominent action button. Once the user has initiated a new post, they are prompted with an overlayed screen, which is where they will be creating their book review.

UX-book-review-13

Ideally, the student would answer the questions, upload and activity, and by clicking the “Done” button, create a new book entry.

As a flow, we think this is a good point to start at. However, there are many pedagogic details within the Book Review process that still need some cracking, by next week we hope to have most of those questions resolved.

Playing With Amphitheaters

Leave a comment
Playful Communication for Serious Research

This past week Will, Hugo and I met with our research professor, Sebastian Heath, who has extensive knowledge on ancient amphitheaters, particularly from the time of the Roman Empire. The three of us are taking a data visualization course outside of ITP with Sebastian, at an institute that is part of NYU called ISAW (Institute for the Study of the Ancient World). We all have great chemistry working together, and our researcher/professor Sebastian is incredibly excited to work on this project with us. Here are a few thoughts that came up when we met this week:

  • We would like to explore new ways of visualizing what it was like to attend events at amphitheaters during the Roman Empire. We will look at quantified data we have but translate it into terms that people can relate to. For size, giving a feeling of the size, for sound, giving a feeling of the crowd, and so forth.
  • Comparing events that happened in the amphitheaters back then, with events that happen in large arenas and settings today (sports event, concerts, etc.).
  • Use the artefacts that we found around amphitheaters as a way to bring these places to life (storytelling through the artefacts).

playful-comm-direction-1-dalit-page1

The experience we are thinking about moving towards is an mini exhibition that will have some kind of static fixture, with digital dynamic information overlaying. We are also looking to build an augmented reality component for browsing amphitheaters and using the Oculus Rift to fully immerse the visitor. We may also compare the structure of the amphitheaters the way they were initially built, with Google street views of what they look like today. Here’s an example of a street view of the Colosseum in Rome!

Donut? Donut!

comment 1
Subtraction

Last Friday, Ben showed us an example of a project done on the CNC machine. He kept referring to as a donut. This is what it looked like:

16511816301_aec639af9e_z

The more I kept hearing the word “donut”, the more I wanted to try to make one using the CNC machine. And here’s how I did just that.
 

Materials and Programs

Before materials, I just want to mention that it’s great to work on this kind of stuff with friends — especially if the is a new area (like it is for me). I’ve been working with Maya Tal and Ainsley O’Connell these past few weeks and it’s been great!

So, back to materials. For this project we used plywood, a 1/4″ bit for the CNC, the CNC machine, and a bunch of new programs: Vectorworks (which is a Computer Aided Design = CAD program), MasterCam and the Techno CNC Interface. I’ll be completely honest, I don not like Vectorworks at all, and I have a hard time understanding why Illustrator can’t be used instead. It’s ok to use when drawing basic geometric shapes, but what if you want to create a squiggly, rounded shape (the icing of the donut)? Even when using a Wacom pen, and even though there’s a tool for drawing free-form shapes in the program, smooth, rounded lines just doesn’t seem to translate well at all on Vectorworks. So, for the icing shape of my donut, I imported an Illustrator DWG file and spent some good time cleaning it up so that Vectorworks would like it.

Screen Shot 2015-02-16 at 10.33.51 PM


Once the files are completed in Vectorworks, they are exported and opened (on a PC!) on MasterCam. MasterCam is the program used for defining the width of the material, the bit size that will be used in the CNC machine, and the cut / pocket on the material. Setting the direction if the job on the contours is super critical, and there’s rule you must always remember:

Counter-clock wise → In

Clock wise → Out

IMG_8321

Once the settings are all in, MasterCam will show you a quick animation of the job.

Finally, last destination before the actual CNC machine starts working — Techno CNC Interface. This is a pretty simple past, basically this is where you pull up the file you have prepared, and set the origin point for the CNC router to start it’s job. But, before even touching the computer here, we first needed to set up our material and mount it to the CNC bed.

drilling

Once everything was mounted correctly and there were no loose areas, we could make those last setup commands and get the CNC machine running!


The CNC Monster Machine

This machine is nuts. I think the biggest surprise was how fast it is as opposed to The OtherMill from last week. Here’s the beast at work:

IMG_8332

IMG_8333

IMG_8334


And here’s what I what I got after the CNC job was complete:

IMG_8335

I was so happy with the results from the CNC, I didn’t think the result would look like this. From here there was only one thing to do — PAINT!

But again, before jumping to paint, there was a minor detail I had to take care of. The sprinkles didn’t fit perfectly into the pockets I made for them (I didn’t cut through the plywood completely, I left some material in order for the sprinkles to be a bit elevated). Ben suggested that go back to Vectorworks, make slight adjustments, and cut new sprinkles in the CNC. I should have listened. Instead, I thought that hand sanding them would be enough and that the acrylic paint layer wouldn’t be that significant. At the very end, I used a hand dremel to sand the edges of the bottom of the sprinkles, and had to hammer them in. Note to self: listen to the pros next time!

So, paint. This was a lot of fun. I picked up some primary acrylic colors down the block and started mixing them to get the cartoon-y colors I was looking for:

dalit

donut-in-progress

And with the help of some wood glue here and there, we have a donut!

donut-holding

donut-close-up

The OtherMill

comment 1
Subtraction

This week I became familiar with “The OtherMill”, which is essentially a mini CNC machine. The OtherMill is great for small, precision work, and can mill pretty tough materials such as aluminium (which is what I milled this week).

The Other Mill Became Ill

My first trial on the machine did not go so well. Before I describe what went wrong, I’ll give a quick overview on how the machine works. The OtherMill is a routing tool, so it works with bits. These bits engrave or cut the material that you load according to the SVG file that you send. You can also control the depth of engravement and play around with that, which I think is pretty neat. In order for this process to work, the machine has to “calibrate” the settings every time a new job is set. Part of this calibration includes making sure the actual bit knows the distance between it’s initial point and the material, otherwise, it will not be able to do the job.

On my first round using The OtherMill, everything was indeed set up exactly the way it should have been, but, something interesting (and unfortunate) that happened was that during the actual milling, the bit itself start to slip a very tiny bit, creating a lag in the job. Here’s the thing about The OtherMill — if you start the job and set an engravement for 0.016in, it will do that engravement as far as it’s concerned. The OtherMill doesn’t know if the bit is lagging in the middle of the job, so you can imagine that this could consequently meaning that the engravement will be deeper than you had intended it to be in the first place. And that’s exactly what happened in my case; I set a cut, the bit slipped a tiny bit in the middle of the job, and as a result, started cutting the bed of the machine (once it had gone through the aluminium).

IMG_8273 copy

IMG_8274 copy

Second Trial: Successful Comeback

After getting a good understanding of how delicate and precise The OtherMill is, I was ready to get back on the horse and giving the milling a second try. Read More

Building an Online Class Library // Research

Leave a comment
Project Development Studio

This week I made some important progress on the research side of the project. I don’t think it’s enough to build a final, flushed-out product, but it’s enough to get started with, and to start building wireframes in the next few weeks.

Education Week Webinar

This past Wednesday, I attended a webinar that was part of Education Week titled, “Deepening and Widening the Way We Teach Writing in K-5”. Some important points that were brought up included:

The Skill of Writing

Writing standards

  • Students write opinion pieces, informational pieces, and narratives
  • Students learn to use the writing process to strengthen some of what they write
  • Students keyboard and use technology to publish writing
  • Student writing becomes “routine” by third grade

Language standards

  • Students demonstrate command of language and mechanics conventions when writing and use a formal style


The Content of Writing

Writing standard

  • Students gain information for writing from print and digital sources
  • Students can draw evidence from grade-appropriate sources
  • Students write for a range of discipline-specific tasks

Language standard

  • Students acquire and use Tier 2 and 3 meaning vocabulary in their writing


How to Overcome the Prior Knowledge Problem in Writing
  1. Deepen Writing Instruction
  2. Provide Students with Informative Experiences Before They Write
  3. Arrange language experiences and give demonstrations
  4. Integrate writing with vocabulary instruction of topical word sets
  5. Engage students in inquiry-based writing
  6. Have Students Write to Print and Digital Sources Widen Writing Instruction
  7. Have students write opinion pieces about books and other texts
  8. Give students questions to guide their reading of the source(s)
  9. Teach students to use evidence from texts in writing without plagiarizing
  10. Have Students Regularly Write to Learn
  11. Elicit quick writes across the curriculum
  12. Quick writes after / before / during learning
  13. Have students write for a variety of topic-specific tasks
  14. Teach Students How to Conduct Research Projects
  15. Teach students how to take notes on sources, and organize those notes in preparation for writing
  16. Teach students how to integrate two or more sources into their writing

Read More

Mapping Religion in Jerusalem

Leave a comment
Mapping and Data Viz for the Ancient World

It’s not secret to anyone that Jerusalem is a tense and intense city, especially when it comes to religion. Judaism, Christianity and Islam all see this city in some way or another as a place of significant religious importance. Will (my classmate) and I are interested to do research in this field and see if there is any way to quantify religious importance of these religions throughout the years. Since this is obviously a very subjective topic by definition, we thought that maybe through the data and discoveries of artefacts dating to certain time periods, we may find patterns emerging and clusters relating to rituals, ceremonies and practices of a certain religion.

Here’s a visualization I designed for my interpretation of this idea:

jerusalem-religious-map

jerusalem-religious-map2

jerusalem-religious-map3

jerusalem-religious-map4

jerusalem-religious-map5