Using Scary Tools: Part 1

comment 1
Subtraction

“Subtraction” is the name of a class I will be participating in this semester, where we will explore a variety of materials, and tools used for subtracting from those raw materials. Some examples of tools are hand router tools, the laser cutter and the CNC machine.

This week, our homework assignment was to create this shape by using the hand router tool.

sub-hw1-shape-01


Look complicated? It’s not! Let’s see how it’s done.

Here’s a pic of the material I used.

IMG_8229

This is plywood, it’s not of great quality and it’s pretty cheap, but since this exercise is for familiarizing ourselves with the tools in the shop, plywood is fine.

In order to figure out the angle of the frame, I needed to create a square, and find the center and connect the dots of one inch in of the perpendicular lines.

IMG_8231

Once I marked that, I went off the the shop (wood shop, of course).

As I mentioned earlier, for this exercise, we needed to use the hand router tool. The hand router tool has a drill bit at the top, and that drill bit eats away at the material. However, in order for that to happen precisely, it is required to use stencils and sometimes external assets (like rulers for example).  In this case, I used a stencil that serves kind of as a compass (for drawing circles). I attached the compass stencil to the head of the router, so that the drill bit now acts the same way a pencil would in a compass.

IMG_8241

Once that was attached I could carve the 3/4 circle

IMG_8240

IMG_8239

Something important to know about the hand router tool: you don’t want to carve or cut anything in one pass. The best and most precise, most smooth way of carving or cutting, is to make multiple passes over the same path. Essentially when this mean is that after each pass, you lower the drill bit just a little bit in order for it to eat away at slightly more material.

So, back to our project. The next part was to cut that straight line in the remaining quarter of the frame. In order to do that, I needed to measure the radius of the hand router and the diameter of the drill bit in order to figure out where to align my ruler. Once I had that figured out, it was time to get back on the hand router.

IMG_8245

And that’s pretty much it! All that was left to do was to cut the sides, and viola! We have our interestingly shaped frame!

IMG_8256


Building an Online Class Library // First Steps

Leave a comment
Project Development Studio

If you read my previous post, you know that I recently got in touch with my first grade teacher and have started working on a project with her. This will most likely be an archive for kids to share their reading experiences, and view those of others.

In building this project I imagine to have a harmonious relationship with Mrs. Mason. We will most likely be making constant iterations, so I see it important to know each other’s strengths. As far as expertise goes, this is how we may define our roles:

Kim Mason

First Grade teacher in the Kyrene District in Arizona for 25 years. Very passionate about her profession, and likes to explore creative methods for teaching. She will serve as the pedagogic expert as far as what may or may not work with our target audience.

Dalit Shalom

Designer, explorer, problem solver for the past eight years. I love to learn about the world around, create and communicate exciting experiences. My authority will be the experience and visualization for the project. I am also the project leader, so I will be conducting interviews, research and play testing on a regular basis.

It goes without saying though, that we will naturally be wearing each other’s caps from time to time. Nonetheless, our vision is to brainstorm, explore formats, and question together.

Asking the right questions

Speaking of questions, that’s the first thing I thought we should explore. Since we come from different backgrounds, and I personally have not set foot in a first grade classroom for close to 25 years, I put together some initial questions for Kim to answer.

  1. What tools / worksheets / assignments are assigned to kids nowadays?
  2. What’s the timeframe like from choosing a book to writing a report?
  3. Do the kids do any kind of sharing / presentation / interpretation after reading a book or are most assignments focused on writing an actual report?
  4. Are there any “best-seller-must-have” books that all kids read or need to read that could be a good starting point?
  5. If possible, can you share a book report that was completed just for me to get a sense of where this could go / size / level?
  6. From an academic point of view, what skills would you say are important to cover in a project like this (ex. writing / reading / sharing / grammar / research / art & expression / etc)?
  7. I see this as a growing archive where kids contribute to possibly the same books
  8. Tell me a bit about the exposure to technology at your school. Are the students plugged in to devices from the time the enter the classroom, or are there activities that are still “analog”?
  9. Do kids in your classes read digital books or printed books?

Read More

Mrs. Mason and I Reconnect After Over Twenty Years

Leave a comment
Project Development Studio

kim-and-dalit

This is the beginning of one of the most exciting projects I think I will create. A few months ago, I got in touch with my first grade teacher through Facebook and we started chatting as any two people who hadn’t spoken in over 20 years may. Kim (formerly addressed by me as Ms. Blau, and later, Mrs. Mason) asked me how my family was, what I was up to and where is was living. When I asked Kim what was new on her end she naturally answered, “I’m still teaching first grade.” Woah! I thought to myself, Kim has been a teacher for over 20 years for the same age, she must be a wizard at what she does. Immediately, I targeted this reunion as a seed for the beginning of a great project.

text-1

What project? I had know idea. But just thinking of the opportunity to build something with my teacher, who till this day I talk about enthusiastically in many scenarios, blew my mind.

It was time to get the ball moving. I knew that one of my classes at ITP would be a great environment to develop a self-driven project like this. So, I emailed Kim a bunch of ideas I had, here’s the email I sent:

Hi Kim!

I’ve been putting this email together for a while and the truth is that I could probably add more ideas but I thought that it might be wise to mention just a few and see what you might feel strong about. My background is primarily in design (graphic /web / app design) but in this degree I am acquiring more programming and technical skills.

It is not a requirement for this course to work with a teacher, but I thought this could be a unique opportunity for the two of us, having the background we have and experiencing the classroom together once upon a time. I’m sure that we can create something very valuable and meaningful together.

I’d be happy to hear your thoughts on any of these ideas! What ideas below do you think could work? Maybe there are ways to combine a few of them?

We can chat over Skype if you like sometime too.

Best regards for now,
Dalit

Ideas for projects that incorporate Design / Tech / Education

Show and tell

I was thinking along the lines of a database for show and tell, or maybe a physical booth for presentations.
Emphasis: public speaking, introducing new ideas to classmates

Collaborative blog

Something along the lines of “Pay it forward”, each classmate contributes to the communal pool of writings, shares thoughts on a theme or specific class. Could also initiate activities, etc.

Volunteer organizing kit

Develop a system that will provide students with tools to organize volunteer events like bake sales, clothes / food drives, etc.

Eating healthy

System for kids to build their own meals / lunches + activity at lunchtime

Infographics for kids

Charts and systems that can help kids with research projects

Little Bits

Any intro to hardware projects that uses these (!): http://littlebits.cc/

Petting zoo

Intro to animal anatomy and introducing a new animal every week

Sharing

A system that will encourage sharing within the class

Graphically designing a curriculum

Using the classroom as a canvas, turning the classroom into a museum.
Making creative use of bookshelves, screens, desks, space etc.

Learn from everyone

kids teaching kids, share ideas and discoveries.
Link to idea here.

Arousing curiosity “How things work / are made” through video series

https://www.youtube.com/watch?v=Q6wGSFcE_lc
https://www.youtube.com/watch?v=Yk82qrGclWo
https://www.youtube.com/watch?v=59e7WYd24gI

Online class library

Books that have been read (archive) and books the class is reading together, book reports, book reviews, etc.


Other ideas

– Something for learning math
– Something for developing organization skills (planner, prioritizing)
– Geography game

Things I would like to keep in mind in general:
  • Focus on the students, not on the technology (the technology needs to stay a means for the end)
  • Something big enough to create an impact, small enough to complete in a semester.


Kim wrote back to me a few days later:

Ok- I really took a close look at your ideas. I would like to do the online class library. I thought about one of your goals of emphasizing the kids and the technology should be in the background. This could be a really cool project because it would incorporate so many academic areas and it reaches learners at many different levels. I also think this is something that I can use from year to year. I think future classes would enjoy reading book reviews/reports written by their peers. What do you think? Let me know where we need to go from here.

Alrighty. So we have a direction; I think it’s time we start.

Design for Assistive Technology // Final Project

Leave a comment
Applications

Over the course of the semester, I had the great pleasure of working on a fantastic assistive tech project, in collaboration with the Byun Lab @ NYU and three other partners: Heather Campbell, Helen Carey and Celine Wu. Together, we continued a project which had initially started two years ago, developing a tool for speech therapists and their patients which will help people who have a difficult time pronouncing the “R” sound. In a nutshell, this is done by visualizing the sound wave and comparing the “ideal” pronunciation with the incorrect one, while guiding the patient to make small yet specific tweaks in order to better the sound.

Our development focused primarily on the interface of the app. My position was UX + UI. Below is a quick run through the different stages of the project, and what lies next for future groups who continue.

flowchart-dat-color-small

Recipe Search by Item // Final Project

Leave a comment
ICM / Networked Media

JavaScript was a brand new language for me 7 weeks ago. Up until then, I knew how to read HTML and edit a bit in CSS. Today, I feel a lot more confident both with Markup and CSS, and have a new friend in my development toolbox named JavaScript. JavaScript is great, but not that simple. I find it will take more and more practice until things really start to sink in. So, before I tell you about what I did, I want to briefly attempt to explain what JavaScript is to begin with.

If HTML is the structure and the content of a site (for example), and CSS is the style, the design, then you can almost fill in the blank to what JavaScript is.

vent-diagram-01

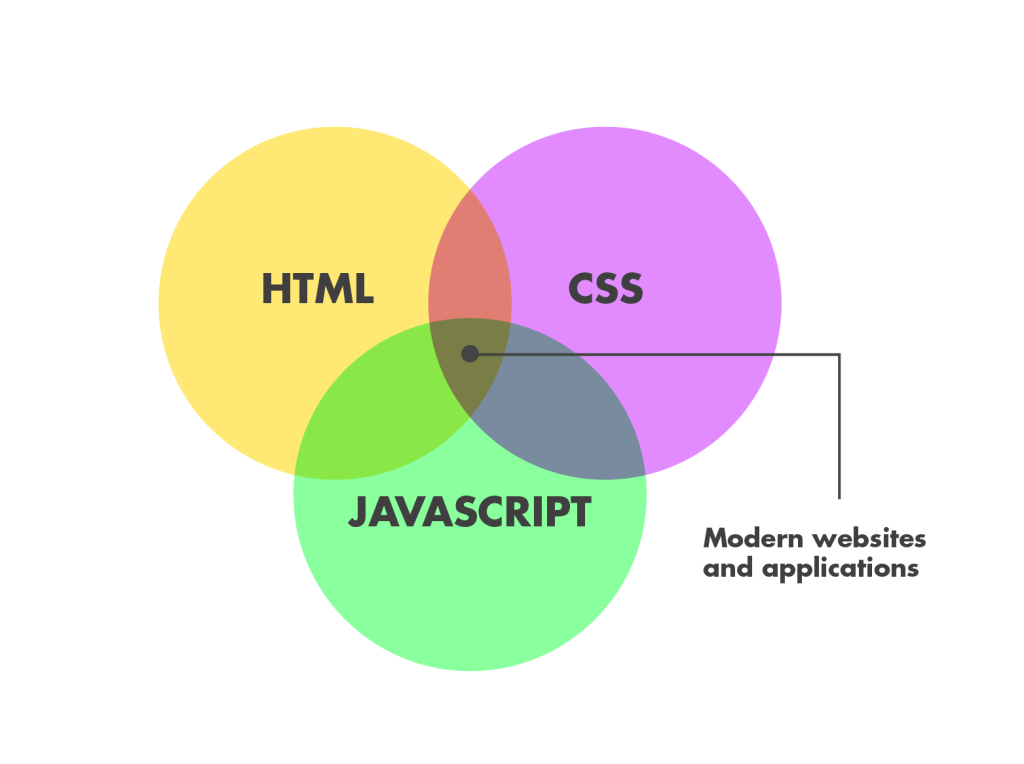
I guess to simplify things, it’s safe to say that it’s the How of the interaction. It is a magical layer that brings a website to life, makes it dynamic (for example, an updated calendar, the appearance of elements, getting data, etc.) I happen to be very interested in how JavaScript can be used to enhance the interactive experience on a visual level, but for this project I actually used JavaScript as way to communicate with an external API, request data from them and display it in a design that I put together. I’ll briefly to go through the steps of what it means to connect to an API.

API stands for Application Programming Interface. It is most commonly used when a website or service would like to collect data from an external source, maybe even select only part of the data, and then push it out within the initial website (so external data being shown within another website).

Since I built a search engine with the output being recipe-oriented, I wanted all my data to come from a source that would be recipe specific. I found a website called Yummly and their API is open for use for up to 500 calls a day. So, If someone has a site that has more than 500 users searching the site a day, they would need to pay Yummly an access fee for the API (depending on the calls per day). In order to make a connection with an API you need an app ID and an app Key:

X-Yummly-App-ID:app-id

 X-Yummly-App-Key:app-key

Those are codes you get from the data website (in this case, Yummly) and that’s their way of authenticating you and tracking your use of their data.

Once you’ve go that set up, you’re pretty much ready to start! You can call the API through GET requests (which literally means ‘get information’) and can specify exactly what information you wish to display according to the sites names for those functions. Let’s have a look up close and see how it all works.

Setting up the API ID and Key

This part can be tricky but so rewarding once it’s set up! This line of code goes at the top of the JavaScript document and this is what it looks like:

function searchRecipes() {
// 1. send request to API
$.get("http://api.yummly.com/v1/api/recipes?_app_id=30885432&_app_key=6eaaa7c45fffeea3f37d9adb28ad9960&q="+document.getElementById("search").value, function(response)

{
 console.log(response);
 //saving the data in an array
 var matches= response["matches"];
//loop through this array and read each result
for(var i=0;i<matches.length;i++){
var imRecipe = matches[i];
//console.log(imRecipe);
requestRecipeImage(imRecipe,i);
}

});
Calling information within the API

So I called the API, saved the data to an array and looped through the array to get results. Now, in order to be more specific with the type of information you retrieve, you will need to refer to the documentation of the API and see how they address specific information (Yummly has great documentation by the way!). Here are a few examples for syntax to call specific information from the API:

recipeName : The display name for this recipe.

smallImageUrls : An array of small thumbnail images for this recipe

totalTimeInSeconds : The prep time plus cook time for this recipe in seconds

Then, when I want to call that specific information, I create a variable and a place for it (“var” is short for “variable”, I created a div for it. It looks something like this:

var myRecipeName = document.createElement("div");
 myRecipeName.innerHTML = recipe.recipeName;
 myRecipeName.className = "recipeName";
 myRecipeName.id = "name"+num;


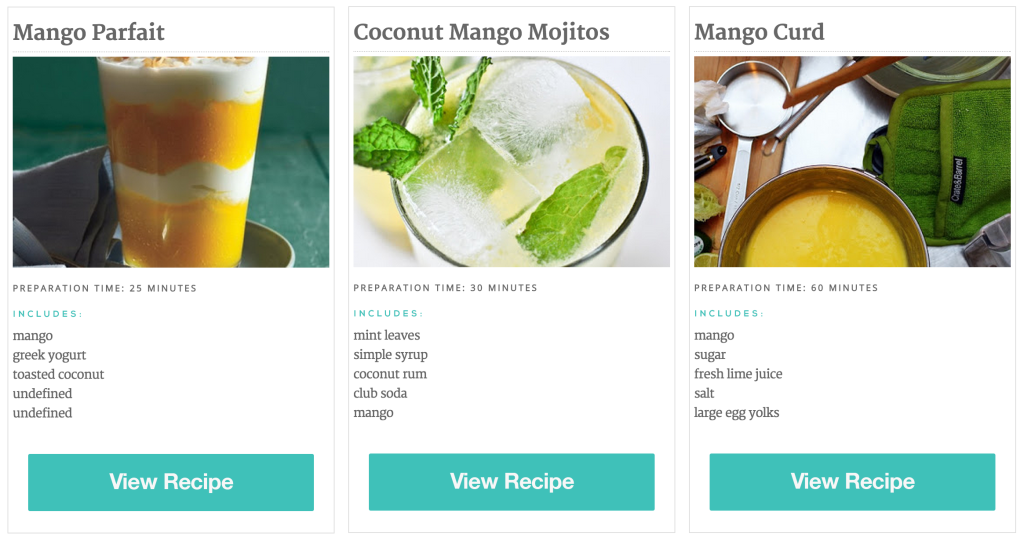
Something that took some time to discover and understand is that Yummly do not provide the full recipes, you actually have to click out to see them on their initial websites. What Yummly does is collect the data around the recipes, enough to get the user interested that if he/she wanted, they would click through to the actual recipe. Therefore, I thought it made sense to create something similar to a Pinterest board. The user can search recipes by ingredient (like “onion” or “raspberry”) and receive tiles of potential recipes that show an image, the preparation time, ingredients and a button clicking to the source of the recipe.

This is what the design looks like:

Screen Shot 2014-12-15 at 9.35.25 AM

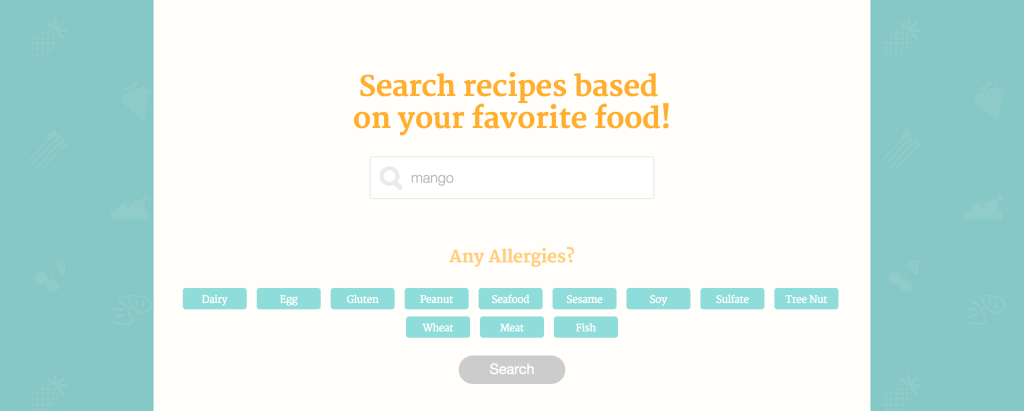
The user can enter their ingredient or food to search by. They can also click for any allergies, and the engine will filter out any irrelevant recipes. After clicking “Search”, the results appear:

mango-recipies

I intend to continue with this project, so stay tuned for upcoming posts!

Silophon // Week 7

Leave a comment
Physical Computing

IMG_7882
This week (which was our final week working on the project!) we went through some obstacles with the sound. Along the way we had proposed various ideas to each other: How about trying to store the sound files on the Arduino Mega and playing it from there? We tried that but for some reason we were getting an awful digital sound (although the bright side was that there was some kind o communication going on). We were thinking of a bunch of other ideas, like using a Teensy, or using a MIDI Synth, but even if we were certain that those products would work, we had no way of ordering them in time for the final presentation. So, after consulting with our dear friend and super-knowledgeable classmate Nick Bratton, we were encouraged by all means to try and get our sound working by using MAX MSP.

This is what the program’s interface looks like:

Screen Shot 2014-12-07 at 10.51.20 PM

Basically, the program works in a very linear matter in the sense that it shows you all the steps (that you create) from beginning to end. The program actually ended up working really well for us and we used it for our final presentation as a sound generation.

The Story of Ada Lovelace

While Louis and I were putting the last pieces of the Silophon together, Louis mentioned that he would really like to meet the lady behind Adafruit. All this time I was sure the lady’s name was Ada, but actually, Louis enlightened me that Adafruit is named after a lady by the name of Ada Lovelace who is actually known to be the world’s first programmer. If I remember correctly, Ada was the daughter of a poet, and her mother forced her to study mathematics so as not to end up with a the “lousy future” of a poet. Ada indeed studied mathematics and and her notes on a certain type of machinery are considered to be the world’s first algorithm.

We also thought it would be great to have all of our wiring and connections be more organized, so we built a shield to house over the Arduino:

IMAG0379

And that’s it! We finally accomplished to create the instrument we could only dream about 7 weeks ago.

Silophon // Week 6

Leave a comment
Physical Computing

This week we dedicated our time to working on the final fabrications of the Silophon. We were a bit OCD with our measurements (to the millimeter!) so assembling the pieces at the end kind of felt like assembling furniture from Ikea.  We learned to use a lot of scary tools and how to avoid cutting fingers. Here’s a glimpse at our process in the Shop:

We started out by cutting the base of our Silophon. Here you can see Louis using the Circular Saw Machine (yikes!)

IMAG0277

I used the Bandsaw to cut the keys for the Silophon.

IMAG0285

IMAG0289

After using the Drill Press to drill sockets for the pegs (that will soon hold the keys), we sanded the wood in order to get a smooth finish.

IMAG0301

Remember those buttons we bought last week? Well, we had to figure out a way to sand the back of the in order to glue them firmly on the felt keys. We did this by using a Dremel Sanding Tool.

IMAG0326

IMAG0327

It was then time to cut the felt. Over the weekend I had tried a few techniques on how to layer felt. We needed to find a solution since thick felt is pretty inaccessible if you just need a bit. So, we used an iron-on adhesive and layered 4 sheets of felt together. We then used a fabric rotary cutter to slice the pieces according to the size of each key.

IMAG0323

Just a bit of Superglue…

IMAG0328

… and Viola! We have our Silophon!

IMAG0339

animated-silophon-2

Check back with us next week when we show how we setup our functionality and sound in to what we built today.

Silophon // Week 5

Leave a comment
Physical Computing

This week, we started building and assembling our final version of the Silophon. We started out by mapping, measuring and calculating the sizes of the different pieces we will need to build and construct. After that, we discussed the various materials we would like to use and where we should buy them. For example, we thought the mallet used for hitting the keys should probably be made of rubber and then wrapped in felt.

Over the week we scouted out our materials from around the city:

Wood

The Home Depot

Rubber

For the mallets: Canal Rubber

Felt

Purl

Buttons

For the ends of each key: Tender Buttons

The button store is a must if you’re even around the Upper East Side:

IMG_7774

IMG_7773

These are the buttons we chose:
IMG_7771

IMG_7783


IMG_7780

Time for us to get back to work.. More to come next week!

IMG_7785

Silophon // Week 4

comment 1
Physical Computing

This week we setup our circuit, tested the sound and made sure our idea works.

Setup

Screen Shot 2014-11-16 at 8.21.07 AM

How it Works

R2R Resistor Ladder

The resistor ladder is essentially a series of voltage divider so the input closest to the ground adds the least to the output (it’s the least significant bit), and the input closest to the output adds the most to the output (it’s the most significant bit).

Screen Shot 2014-11-16 at 8.21.50 AM

Here is a video demonstrating each input individually, and then adding them all together.

Code

First we need to store the data that we want to output:

PROGMEM unsigned char data[48]

This stores a 48 byte array in the program memory – flash memory as opposed to SRAM. The Mega 2560 has 8kb of SRAM, and 256kb of flash memory. Our first test was a half second sound file sampled at 8kHz and was about 4kb. We want to have eight distinct notes, so we each one can be up to around 30kb meaning we can sample them at a much higher rate. Alternatively we can sample them at a lower rate and allow lots of different sounds. Next we set the pins as output:

DDRC = 255;

DDRC is a register that controls whether Port C is input or output. Port C is the set of digital pins from 37 down to 30. By setting each bit in the DDRC register as a 1, each pin is set as output. 255 in binary is 11111111, so we could instead write:

DDRC = B11111111;

or

DDRC = 0xff

Next we actually change the output:

PORTC = pgm_read_byte(&(data[i++]));

PORTC controls the output of the pins 37 down to 30, similar to the way that DDRC controls whether those pins are input or output. Because the data array is stored in program memory instead of SRAM, we can’t just access it normally, so we need to use pgm_read_byte with a reference pointer in order to access it. We add one to ‘i’ after we set PORTC, so in the next time through the loop it outputs the next value in the data array. Because we sampled the audio at 8kHz, we need a delay in the loop. If the sample is at 8kHz, the period is 1/8000 seconds (125μs):

delayMicroseconds(125);


Screen Shot 2014-11-16 at 8.22.14 AM

The Code Itself
#include <avr/pgmspace.h>

PROGMEM unsigned char data[48] = {0x00,0x01,0x02,0x03,0x04,0x05,0x06,0x07,0x08,0x09,0x0a,0x0b,0x0c,0x0d,0x0e,0x0f,0x10,0x11,0x12,0x13,0x14,0x15,0x16,0x17,0x18,0x19,0x1a,0x1b,0x1c,0x1d,0x1e,0x1f,0x20,0x21,0x22,0x23,0x24,0x25,0x26,0x27,0x28,0x29,0x2a,0x2b,0x2c,0x2d,0x2e,0x2f};

short i = 0;

void setup() {
DDRC = 255;
}

void loop() {

PORTC = pgm_read_byte(&(data[i++]));

if(i >= sizeof(data)) {
i = 0;
delay(1500);
}

delayMicroseconds(125);

}

The data in this code is just counting from 0 to 47. Real audio data uses thousands of bytes. We get the bytes by taking a sound in Audacity, saving it as a raw file 8-bit unsigned file, and converting the raw file to a header file using bin2h.

Output

Here is a screenshot of the logic coming out of the Arduino when we output the numbers 0 through 47:

Screen Shot 2014-11-20 at 9.42.54 PM


When we switch to the actual sound data, it looks like this:

Screen Shot 2014-11-20 at 9.44.29 PM

Assembling the prototype

IMAG0261

IMAG0258

IMAG0255

IMAG0246

IMG_7753

IMG_7744

IMG_7739

IMG_7737

Sources

https://www.youtube.com/watch?v=tUapZ_JdHLE
http://playground.arduino.cc/Learning/Memory
http://arduino.cc/en/Hacking/PinMapping2560
http://www.arduino.cc/en/Reference/PortManipulation
http://arduino.cc/en/Reference/PROGMEM

Timeline

timeline-silophon